A re you looking for the easiest way to make money from your blog? Then look no further than Google AdSense.
Monetizing with AdSense is by far the easiest and most efficient way to make money online. It’s easy because all you have to do is place the AdSense code on your blog, and then you can start showing ads and making money without having to deal with advertisers directly.
AdSense offers a higher payout to publishers than many advertising networks on the market.
In this article, I’ll explain everything you need to know about adding AdSense to your WordPress website.
Before you jump in and apply to join AdSense, let’s take a look at what AdSense is and when you should start monetizing with blog advertisements.
How Does Google AdSense Work?

Google AdSense is based on a bidding system, which is referred to as an ad auction.
With AdSense, Google connects advertisers with publishers who have a relevant audience for the ads. Advertisers can set up a maximum bid price and determine how much they’re willing to pay for their ads.
If more advertisers bid to place their ads on your blog, you’ll be able to earn more money as a publisher. The best thing is that the ads placed on your blog are contextually targeted to your content.
This increases the likelihood of getting more clicks on the ad, in turn helping you make more money.
When Should You Start Monetizing Your Blog With Adsense?
If you already have an approved Google AdSense account, then technically, you can start adding AdSense ads the first day you start a blog.
But the downside is that without a decent traffic base, you won’t be able to make a lot of ad revenue.
In fact, in an effort to make more money with AdSense, I’ve seen a lot of bloggers place too many ads on their new blog. The problem is, not only will this annoy your readers and create a negative impression on you, but it also deviates your focus from growing your blog.
Rather than placing your ads from day 1, I’d suggest you wait until you have at least 100 visitors per day. Only then, you’ll be able to make a solid income from your blog.
If you want to monetize your website from day 1, instead of focusing on ads, try monetizing it with affiliate marketing. Since affiliate links are naturally integrated into the content, they don’t annoy your readers.
How to Get Google AdSense Approval
Getting Google AdSense approval is not rocket science. Unfortunately, many AdSense applications get rejected due to some insane reasons.
Below are a few tips that will help you get your AdSense account approved.
- Read AdSense policies and make sure your blog complies with all of them.
- Create some valuable resource on your blog that people want to read. Make sure you don’t publish content that falls under prohibited content categories (refer to AdSense policies).
- Provide a good user experience on your blog. All you have to do is to choose a quality WordPress theme that doesn’t annoy your readers.
- Your blog traffic doesn’t matter at all. If your application is rejected and you think the reason is low traffic, that’s not right. You might want to ensure your blog adheres to AdSense policies.
Step 1: Sign Up for Google AdSense
Of course, the first thing you need to do is sign up for Google AdSense. If you already have a Google account, you can sign up with your existing account.

Go to the Google AdSense website and click the Sign Up Now button. You’ll be asked to specify the website where you want to use AdSense and your email address. Complete your form and click Save And Continue.
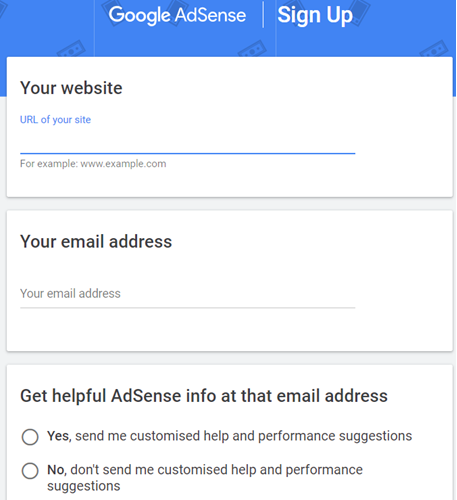
Next, you’ll need to choose your home country and check the Terms and Conditions box to proceed. Finally, click the Create Account button.
Now that you’ve signed up, the next step is to activate your account.
To activate the account, provide your payment details and connect your blog to AdSense by adding a code snippet to your blog.
The easiest way to add the snippet to your WordPress site is by using the free WPCode WordPress plugin.
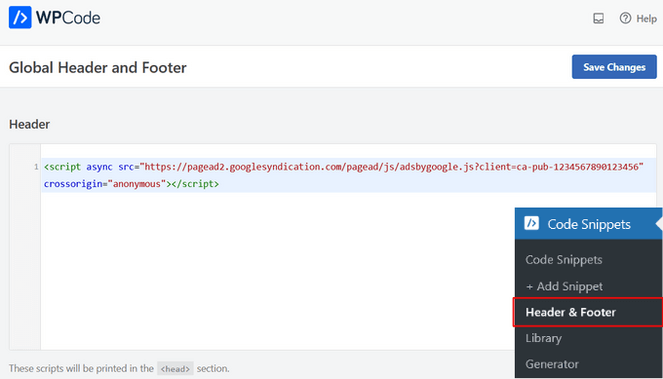
After installing that plugin, you can head over to the Code Snippets » Header & Footer page and then paste the code in the header section.
Google AdSense will review your application to join the AdSense program. The review process may take up to 3 days.
Once your application is approved, you can proceed to the next steps – creating ads and publishing them on your blog.
Step 2: Create Ads in Google AdSense
To create a Google Adsense ad, go back to your AdSense account. Then click Ads on the left taskbar. You’ll find a lot of different options, such as Auto ads and Ad units.
Auto ads: In this section, you can enable automatic ad placement by adding just one piece of code to your blog.
Ad units: In this section, you can create AdSense units manually and then place those units to the exact location within your blog.
Choosing Between Auto Ads and Manual Ads
Auto ads is a relatively new option in AdSense. With auto ads, you don’t have to worry about creating individual ad units and placing them in different sections on your blog.
All you have to do is to enable Auto ads by adding just one piece of code to your blog. Then AdSense will make smart ad placement decisions on your behalf.
For example, just add the code to any particular page or to the entire blog. You’ll eventually see that your ads are placed on the most optimal location within that page, such as in the sidebar, within the content section, after the content section, etc.
The benefit is that you don’t have to spend time analyzing the most optimal locations for placing your ads on your blog. The auto ads feature uses machine learning to make smart placement decisions, so you can rest assured that your blog is optimized for maximum revenue.
The downside of this approach is that you have no control over the location of your ads within a page. These automatic placements could break the look of your theme or it may affect the user experience.
If you’d prefer to have full control over placement, you can manually create the ads and place it on your blog by creating ad units.
2.1 Creating Auto Ads
If you’d rather allow Google to make smart placement with auto ads than manual ad placement, follow these steps:
Click Auto ads in the left sidebar. Then click Get Started.
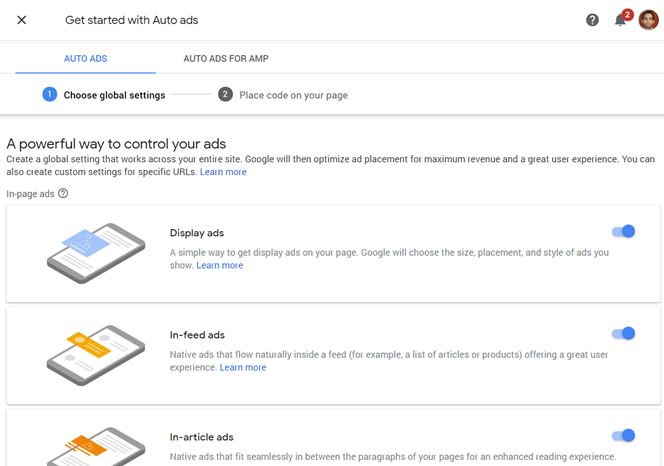
By default, all ad formats are enabled for auto ads. If you don’t want any specific ad type, such as vignette ad, which is a full-screen mobile ad that appears in between page loads, then you can disable that option.
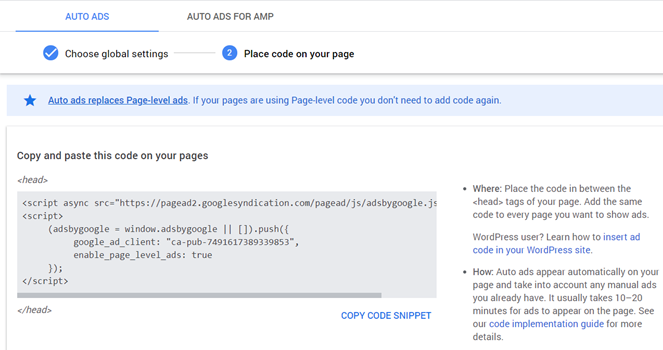
Now copy the code snippet and paste it in the header section of your blog or on a specific page wherever you want to add it. I’ll show you how to do that in the next / 3rd step.
2.2 Creating Manual Ads
If you want to manually manage ad placement for better user experience, follow these steps:

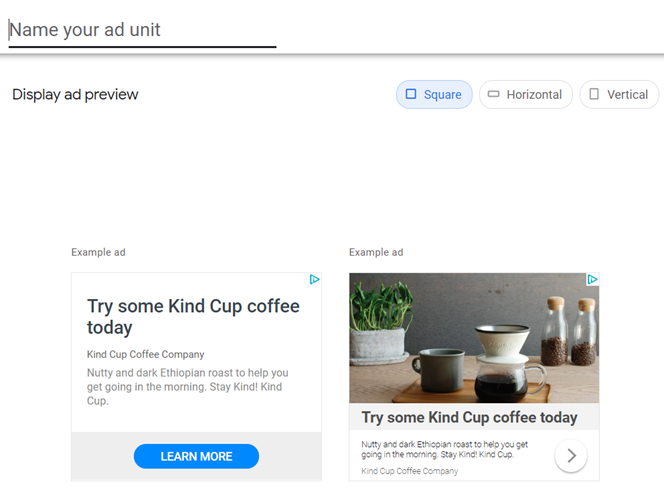
Navigate to Ads » Ad units. Next, choose the ad format that you want to create. For this example, let’s choose Display ads.
On the top left corner, you’ll be asked to specify the name for the ad unit. Then, choose between the ad size (square, horizontal or vertical) and then, click Create.
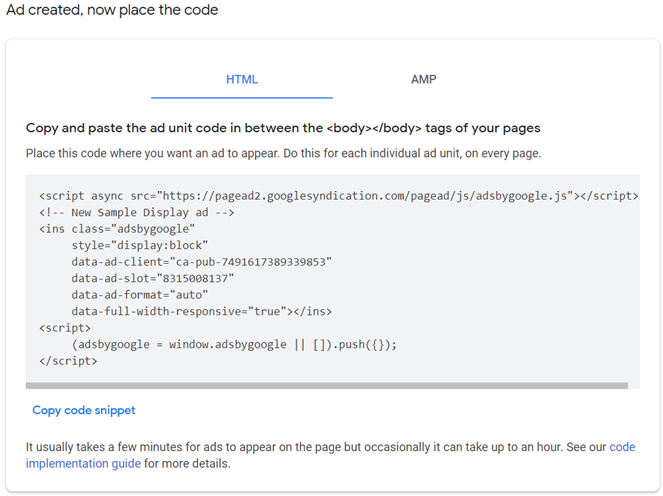
You’ll be shown an HTML code. Copy it and paste it wherever you want to place the ad on your website.
Step 3: Add Google AdSense Ads to Your WordPress Blog
Ad placement is one of the most important aspects of monetizing your blog with AdSense.
Generally speaking, you’ll need to place your ads wherever your users pay more attention to, such as, between the post title and the content area, top header, etc.
You can add your AdSense ads to your blog in a few different ways.
Adding Ads Globally to Your Blog in the Header Section
This step is especially helpful if you want to display auto ads on the entire blog. All you have to do is to copy the code snippet to your header section and auto ads will find and place your ads in the most optimal location on your blog.
Just as you added the verification code, head over to Code Snippets » Header & Footer and then paste the code in the header section with the WPCode plugin.
Displaying Ads in the Sidebar
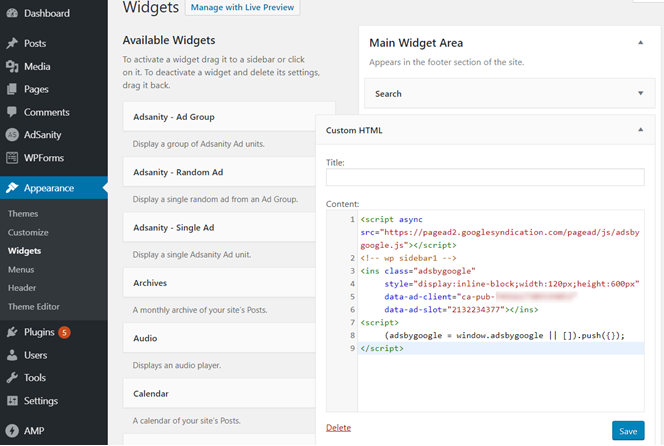
To display ads in the sidebar, simply go to Appearance » Widgets in your WordPress dashboard. Paste the code in the right widget area using the Custom HTML widget.
Displaying Ads Within Your Blog Posts or Pages
Using an ad management plugin like AdSanity is the best way to display your ads inside the content area. Unlike a specific AdSense plugin, you can use AdSanity for other ad networks as well.
AdSanity makes it super easy to manage your ads with WordPress. Whether you want to display your ads in sidebar, content area or a theme template, AdSanity has got you covered.
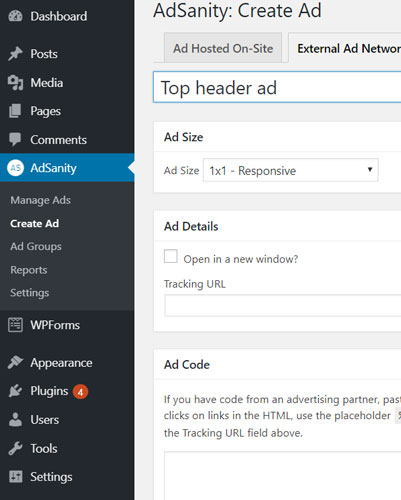
First off, install and activate AdSanity on your blog. Then navigate to AdSanity » Create Ad and then click External Ad Network. Then name your ad slot, choose the right ad size, and then place your AdSense ad code in the Ad Code area. Finally, publish your ads.
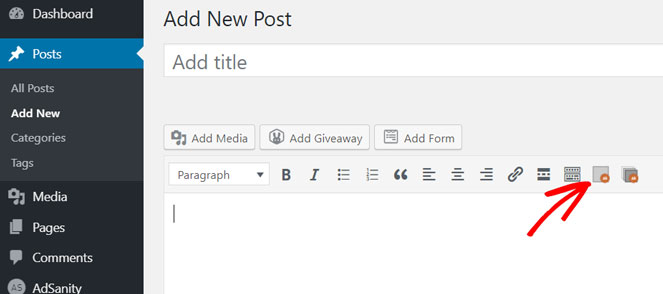
Next, go to the post edit screen where you want to add your ad slots. You can now see 2 AdSanity icons – Insert ad and Insert ad group. For this example, click Insert Ad. You’ll be prompted to choose an ad that you’ve created.
Then, update your article.
Adding AdSense Ads to Theme Templates
Displaying ads inside the content area of individual articles is a great strategy especially if those articles drive in a lot of traction. However, you don’t want to update all published articles one by one because that consumes a lot of time.
Instead of that, you can easily add the ads to your theme templates.

After you set up an ad in AdSanity, you can copy the template tag and pate it in the right location within any template.
Note: If something goes wrong, editing theme templates can break your site. Make sure to back up your blog before making any changes. You might also want to consider using a child theme. Find the right location within the template to add the snippet. Otherwise, you’d break the theme.
These are some theme templates where should consider inserting your ad slots.
- single.php: Single blog post template
- index.php: Homepage template
- page.php: Page template
Bonus AdSense Tip: Track Your AdSense Ads
Tracking the performance of your AdSense ads gives you comprehensive insights into how your visitors engage with your ads. With MonsterInsights ads tracking, you can…
- Track your ads’ click-through rates (CTRs)
- Find out the most optimal location to place your ad based on the performance report
- Remove low performing ads to boost CTR and revenue
Using the MonsterInsights plugin is the easiest way to track your ad performance. MonsterInsights is the best Google Analytics plugin for WordPress.
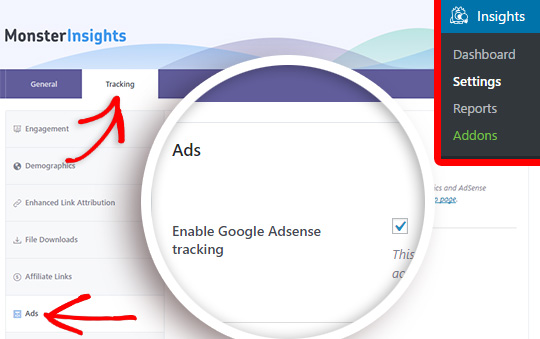
By enabling its Google AdSense tracking feature, you can start tracking your ads without having to touch a single line of code or configure on your Google Analytics account.
That’s it!
I hope this article helped you set up Google AdSense on your blog. You may also want to see our guide on how to increase Google AdSense earnings on your blog.
As an alternative strategy, you should also consider affiliate marketing to monetize your blog.


Thanks for the blog. These will be very useful for newbies like me.
Great piece of content. You can engage your readers with the help of great content and you guys were able to hit the goal.
This post is really amazing.Thanks for sharing such as relevant article.
Great post! it is a nice and helpful content. Thanks for sharing to us.
Thanks, Subha! Glad you found it helpful.
Great info ,good thanks .
Thanks, Malika!
Google deprecated its own WordPress plugin in 2017. Did Google restore it, or is this a “manual” workaround
Are you referring to Headers & Footers plugin, John?
I think so. I used Google’s own adsense plugin until I Google announced it would deprecate it in April 2017. I removed the plugin. Since then, the only ads on my 4 wordpress blogs are Amazon. By the way, you may want to think about COPPA and whether some of the issues now on YouTube could sill over onto blogging if you use ad platforms. I used to talk to the previous owner of Blogtyrant. A typical blog of mine where I used adsense before (and took it off) is https://www.billsmediacommentary.com/
The Headers and Footers plugin lets you add script code to the header and footer area of your site. It’s an easy plugin to use. Give it a try and see if it works for you.
If you want to place ads in your sidebar, you can paste the code into the Custom HTML widget.
Then the Ad Sanity plugin gives you more control on where to place ads on your site.
Hey David,
The way you explained great critical topics in amazing ways. Every step is so helpful for even the person who is no so tech-savvy. This is really helpful for beginners like me. Thank you so much. Keep on posting such a high weighted topic.
Thanks Estella, glad you found it helpful!
Nice Article. Its very Helpful Thank You
Glad you found it useful!
Thanks for the informations.
Very beautiful discussion about all sections of the blog from the blog -making to blogging and other essential activities. I’m really benefited from it. Very placid and nicely penned. So thank you a lot.
I have shared this article as it was the most helpful I have read. Again, Thanks for sharing information about Google Adsense.
Thanks Shamsher, glad you found it helpful!
BlogTyrant, you may not have any idea about who I am – I don’t care because you have given me so much insightful information, idea, and knowledge that I always implemented every applicable task you mentioned in your article right after I read your article.
I can’t thank you enough… Wish you good health and keep up your good work. Thanks
This article is very informative, updated and transparent.
What a useful information provided by this blog! It’s remarkable. Thanks for helping me out
I have a 10 year old blog that makes no money and want to place adsense ads on it to earn recurring revenue. Do you recommend a plugin or doing this manually?