
D o you want to get more traffic to your blog with image SEO?
Images are an amazing way to engage readers and add life to your blog. But they’re also very important for SEO.
Image SEO isn’t talked about as much as normal SEO practices, so it’s common for beginners to build a blog without optimizing images. To us, this is a missed opportunity.
Every blogger should know about image optimization, which is why we created a complete guide about image SEO. You’ll learn what it is, how to apply it to your blog, and the best image optimizer tools.
Let’s get to it!
In This Guide:
What Is Image SEO?
Image SEO is simply optimizing your images for search engines. When you apply image SEO to your blog, it helps:
Rank High in Search Results
We all know that Google can crawl your written content. But did you know that your images are crawled too?
That’s right! Just like written content, search engines want to know what your images are and why they’re in your blog post.
This is why image SEO is so important—optimization helps Google understand and rank your images in search.
Speed Up Your Site
Most unoptimized image files are large, clunky, and take up space on your blog. As a result, your website will slow down.
A slow website affects your SEO rankings and traffic. So you want to make sure your website is as fast as possible.
Luckily, it’s easy to optimize your image files and speed up your site. You’ll read about the best ways to optimize image files later in this guide.
Optimize for Google Image Search
Along with normal search, you can also optimize content for Google image search. For instance, someone might look up adorable photos of Golden Retrievers.

Notice how the first image is from Wikipedia. This means Wikipedia is ranked #1 on Google image search for Golden Retrievers. So if a user clicks on the image, they’ll go straight to Wikipedia’s article.
Imagine if your blog post ranked #1 on Google image search and normal search! Your blog would get even MORE web traffic than usual.
See how important image SEO is? It’s a great way to boost traffic, rankings, and clicks.
Everyone should optimize their images… but how do you do it?
7 Image Optimization Techniques to Follow
You’re probably thinking, what’s the most important element of image SEO?
Well… there’s not just 1 important element of image SEO, there are actually 7 important elements.
And we’ll go over each one in this section.
1. Choose Useful Images
If you read other blogs, then you’ve probably seen images that look like this:

This isn’t a bad photo, but is it good? In other words, does this photo tell the reader anything useful?
Not really. I mean…sure, it’s a nice-looking photo, but it’s not valuable for the reader. There’s no emotion or engagement tied to it.
With that said, don’t add images to your blog just because they look nice. Instead, add images your readers will find helpful.
Let’s take a look at an infographic from our post, how to speed up your WordPress site.

This image is full of awesome statistics about website speed. A reader can learn so much about speeding up their site with 1 image.
These are the types of images you should add to your content. Whether it’s an emotion or a list of statistics, your graphics should always add value to the reader’s experience.
So how do you find these images?
Take Your Own Photos
Most of our phones have amazing, high-pixel cameras. So why not take your own photos?
This way you don’t have to worry about copyright issues or buying photos—they’re all yours.

Sincerely Jules runs a popular fashion blog. Most of her photos are taken by her own photographer. Her unique photos are a great addition to her site.
A quick tip: If you take your own photos on Instagram, you can display your Instagram feed to your blog. So instead of manually adding photos to your blog, Instagram will do it for you.
Plus, Google can crawl your Instagram posts…it’s a win-win!
Design Your Images
Not a photographer? You can always design your own images with an image editing tool.
But wait, isn’t image design hard to do?
Nope! With a simple editing tool, you can create fun and unique blog graphics. Let’s take a look at one of WPBeginner’s images.

This image is engaging, colorful, and simple. You can easily create these types of images with an image editor.
You’ll learn more about the best image editing tool for quick designs later in this post.
Choose Interesting Stock Photos
There are a ton of great stock photo sites for your blog out there with engaging photos, like the one below:

This stock image is full of action. If a fitness blog wrote about weight lifting, they could use this stock photo to explain what weight lifting is. This way it would be easy for the reader to visualize this type of exercise.
Remember, all of your photos should add value to your post. This means all of your stock photos should help readers understand your content more.
2. Optimize Your Image File Name
When you download an image to your computer, the file name probably looks something like this:

You may not blink an eye at the random numbers, but search engines do. Here’s why:
Google can interpret your image file names. So it’s important to rename your file names to something related to your image.
If you start a food blog, for example, you might upload a photo of oatmeal chocolate chip cookies.

The name of this photo could be something like oatmeal-chocolate-chip-cookies.jpeg.
Notice how the image file name above is descriptive? This is the most important part of naming your image. You should give Google context clues about what your graphic is about.
So now you might be thinking, do I have to use a dash between each word?
Yes! Using a dash between each word makes it easier for Google to understand. This means you should avoid file names that look like below:
- oatmealchocolatechipcookies.jpeg – No spaces make it hard for Google to read your file name.
- oatmeal chocolate chip cookies.jpeg – Dashes are needed between each word.
If you want optimized image file names, then stick to descriptive file names and dashes between each word.
3. Add Image Alt Text
Also known as alt tags, alt text is a great way to improve image SEO and rank for keywords.
Alt text is a “text alternative” for online images. In HTML, alt text will look like this:

Alt text was created to help anyone with visual impairments understand your images. But Google also uses it to crawl and index your images.
For this reason, you should add alt tags to every image you upload. And they should tell search engines what each image is about.
Let’s say you own a wild animal blog. If you were to write a post about tigers, you’d probably upload a photo like below:

An alt tag of this photo would look something like… “a serious orange and black striped tiger staring at the wild animal photographer’s camera.”

The alt text above describes exactly what’s happening in the photo. Plus, it includes words like “tiger” and “wild animal” to fit with your blog topic.
Oh, and don’t forget to add your primary keyword! Including your keyword helps your overall SEO ranking. So if your keyword for this post is “Bengal tiger,” then your alt tag could look something like below:

Overall, your alt tags should be descriptive, optimized for keywords, and related to your blog post. And unlike the image title, you don’t have to use a dash (-) between every word. Feel free to write your alt text as a normal sentence.
So how do you change your alt text in WordPress?
On your page, head to your Posts and click Edit.
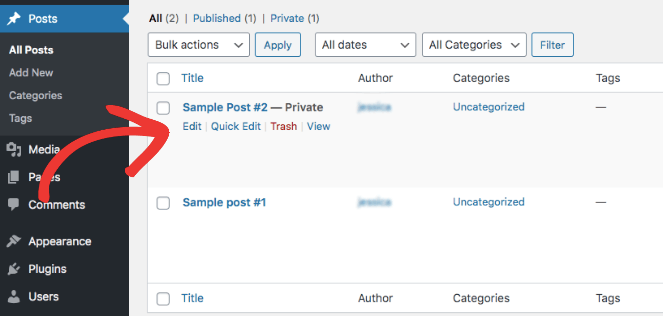
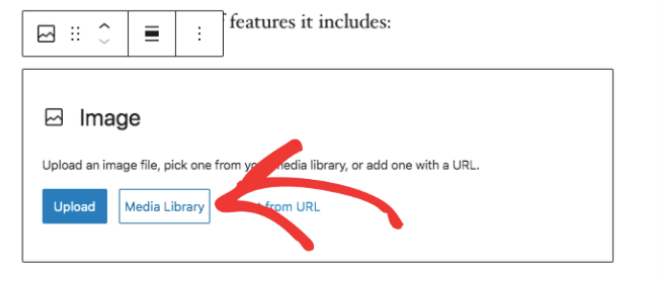
When you upload an image on your page, hit Media library.
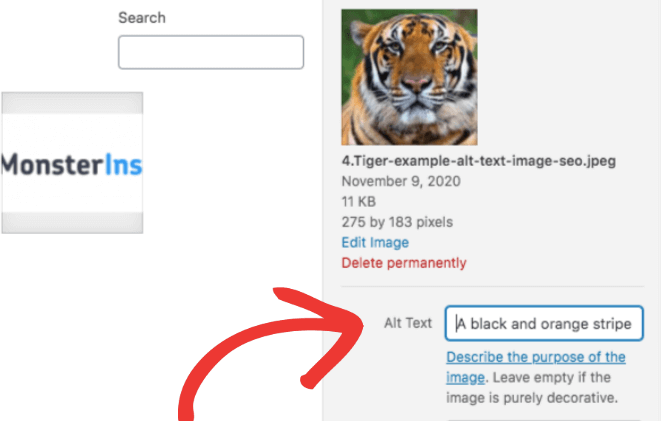
In the media library, you can change the alt text on the right-hand toolbar.
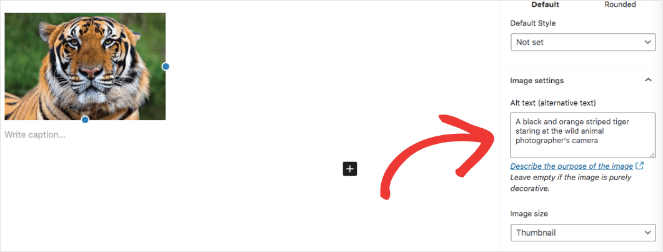
You can also edit your alt text on your blog post editing page. All you have to do is click on an image in your blog post. From here, you should see an alt text editing box on the right-hand side.
Remember to add alt tags to every image you upload. This will help Google understand and rank your photos.
4. Download the Right Image Format
Along with your image file name, you’ve probably noticed the image file format attached to every photo you download.
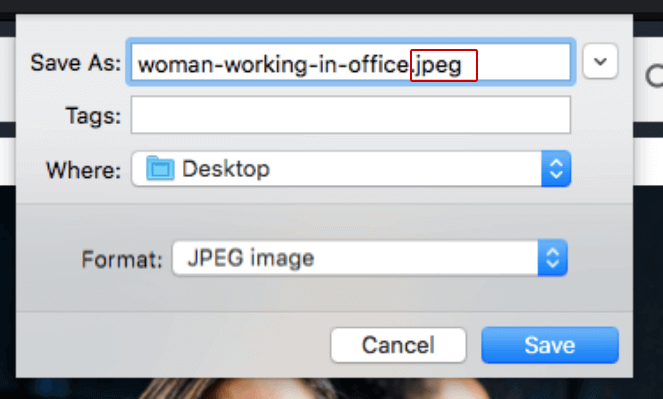
The image file format is how your image is stored. Some images are stored as JPEG files, and some are stored as PNG files.
Wait…the image file format matters in image SEO?
Exactly. Using the right format can directly impact your site speed. The wrong format enlarges the image file, and we all know what a large image file means…a slow website.
So what’s the most optimized image file format?
There’s no one-size-fits-all image format. One photo might work best as a JPEG and the other as a GIF. It depends on the quality and color resolution.
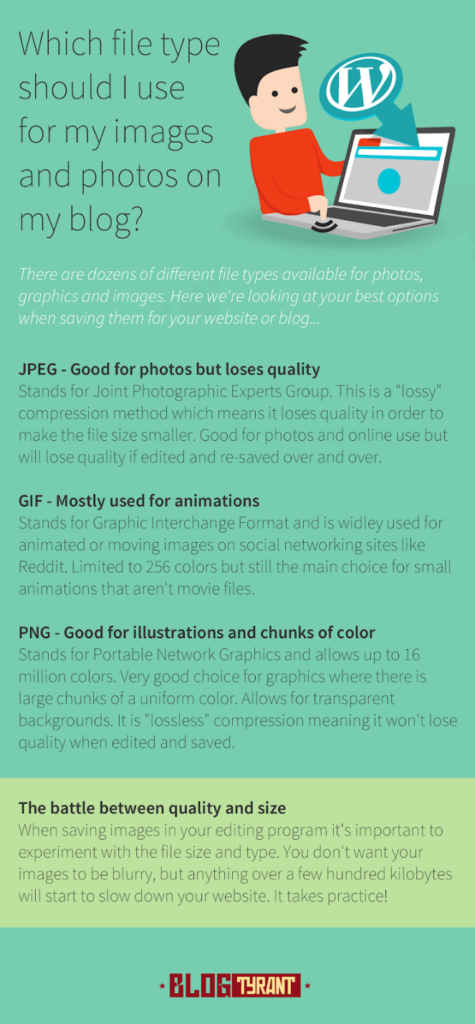
With that, we’ll focus on the 3 most popular image file formats:
- JPEG – This file is compressed, so it slightly reduces the quality of a downloaded image. We suggest using JPEG for colorful images.
- PNG – Unlike JPEG, this file is uncompressed. Images look better with PNG, but the file size is big. You should only use PNG for simple graphics or transparent images.
- GIF – As GIF only uses 256 colors, you can upload simple animations in this format.
You can also take a look at our quick infographic about image file formats below.
So what happens if you download an image and realize it’s the wrong file format?
Use an image editing tool! This is the best and easiest way to change the format of downloaded images and your own designs.
Plus, you can keep this infographic handy for the next time you download or create an image.
5. Resize Images
Every image has a set of dimensions (width x height). For example, you might download a photo that’s 1300 px by 850 px.
If your image size is large, then the file size will be big as well. And so the story goes… large image file sizes affect your site loading time.
It’s a good thing you can always resize your images. But what’s the best image size for SEO?
There’s no right answer. It actually depends on the content width of your site. The content width is how wide your blog content is.
Images that are the same size as your content width load faster than images that are bigger than your content width. This is because they’re uploaded as the right size.
So how do you find your content width?
Google Chrome is an easy way to find your content width. To get started, head to your WordPress site on Chrome.
Click on the three dots in the right-hand corner and find More Tools » Developer Tools.
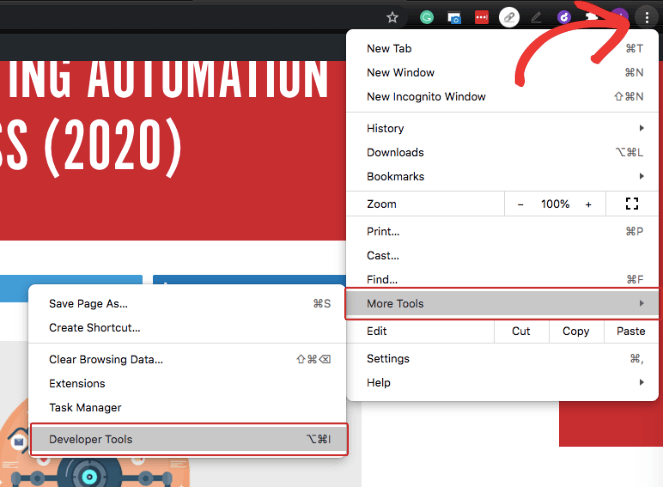
A window of code should pop up on the right side of your site. Don’t worry, we won’t be touching any of this. Instead, click on the element tool at the top left of the window.
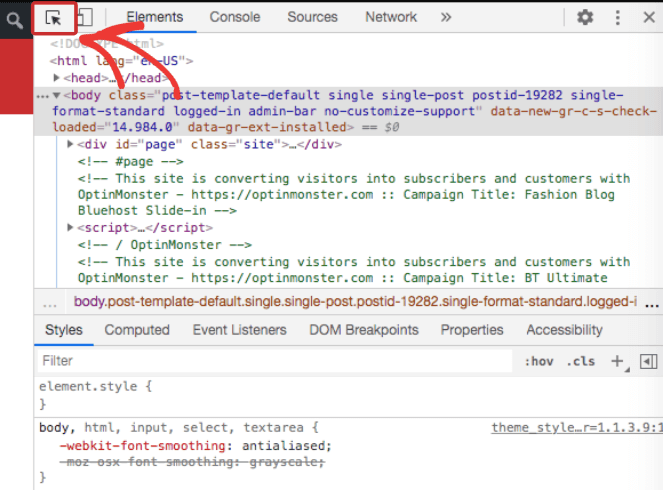
From here, take your mouse and move it over your content and images. Your text and images should highlight when you move your mouse over them.
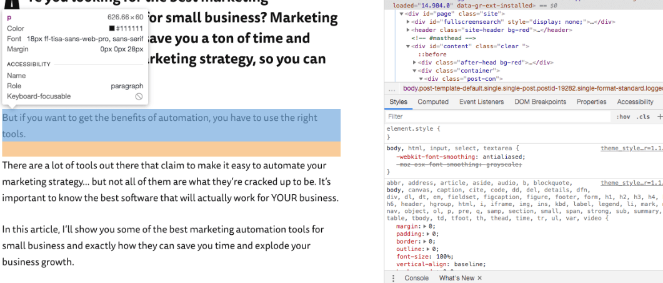
When you highlight a block of text, an information box will appear. You can find the content width of your site on the first line, next to p.
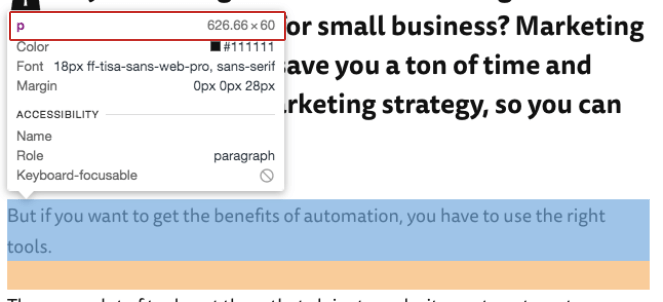
Next to the p, we can see that the content width of our blog text is about 626.66 px. From here, you can choose an image width that’s around the same size as your content width.
Your image height, on the other hand, can change by image. Just make sure your image width stays consistent with the content width.
And once you figure out your image size, stick with it! Don’t upload images of all different sizes to your blog. This can look sloppy.
At Blog Tyrant, we added our image width to our style guide. That way, everyone on our team knows the correct size.
Another thing—you should resize all of your images before uploading to WordPress. This way, your image files are light and optimized beforehand. You can use any photo editing tool to resize your images, which we’ll talk more about in SEO image optimizer tools.
6. Compress Images
Along with resizing images, you should also compress them. Image compression reduces the image file size, yet maintains its quality.

The left side of this photo is unoptimized and the right is compressed. As you can see, the photo looks almost exactly the same.
When we compress images at Blog Tyrant, the file size usually decreases by at least 70%—This is HUGE for site speed!
Like resizing, you should compress all of your images before you upload them to WordPress. We use a tool called TinyPNG to compress our images. You can find more details about this tool at the end of the post.
7. Cache Images
And we’ve made it to the last image optimization technique! The last tip we recommend for image SEO is caching your site.
Caching your site has a lot to do with the backend of your website. So we’ll explain what caching is with WordPress.
Let’s say you wrote a blog post about the 10 best hairstyles for men and women.
When an online user visits your post for the first time, WordPress has to retrieve your blog post information from the database.
The database…what’s that?
The database manages and stores all of our web data. Some examples are blog posts, pages, categories, and tags.
So after a user reads your hairstyle post, they’ll exit out of the page. If the same user revisits your blog post, WordPress will have to retrieve your blog post info from the database all over again.
Retrieving data from the database takes precious seconds from your site speed. If only there was a way for WordPress to store your blog post data and avoid retrieving the same data over and over again.
Oh wait, there is! You can cache your website.
When you cache your site, WordPress can copy and store your blog post data in a temporary storage file. So instead of retrieving the data, WordPress can reload your content on its own.
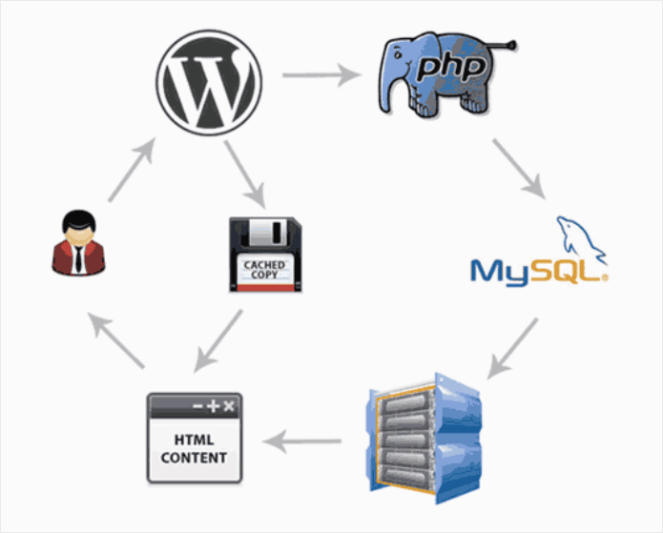
As you can see above, caching is a shortcut for loading data. WordPress uses the cache to skip all of the database steps and will load your blog post directly on your site.
So how does this relate to image SEO again?
With caching, WordPress can load your blog post content and images faster. This means faster loading times and better SEO.
But caching is so technical, how do you even set it up?
With a WordPress cache plugin, of course! In this next section, we’ll go over the best caching plugin for your site.
5 SEO Image Optimizer Tools
There’s a lot to do when it comes to image SEO. But it’s a good thing you don’t have to do it all yourself.
With the following 5 image optimizer tools, you can jumpstart your image SEO process without feeling overwhelmed.
1. Cache Image Tool – WP Rocket
The first image SEO tool we’ll talk about is WP Rocket.
WP Rocket caches all of your images, like we explained in step 7.
Along with caching, WP Rocket is a great tool for site speed in general. Some of its features include:
- Page caching – As you already know, WP Rocket caches all of your webpages and images for a speedy load time.
- Static files compression – Every site has HTML, JavaScript, and CSS files attached. When there’s a lot of code, your website speed can take a hit. WP Rocket will reduce the weight of the files and speed up your site.
- Images on request – Also known as “lazy loading,” your images will load as your online visitor scrolls down the page. So if a visitor only reads half of your page, then half of your images will appear, saving a bunch of loading time.
And even better, all you have to do is install and activate WP Rocket to get these features. No extra work needs to be done on your end.
2. Compressor Image Tool – Tiny PNG
TinyPNG is our favorite image compression tool. Like we mentioned above, compressing your image files heavily impacts your image size and website speed.

With TinyPNG, you can upload and compress up to 20 JPEG or PNG images per session. And it’s free. So here’s how it works:
When you upload an image to the site, Tiny PNG will decrease the number of colors in your image. They call this, “lossy compression.” When your images use fewer colors, less data needs to be stored.
After you upload your images, you can see how much they compress.
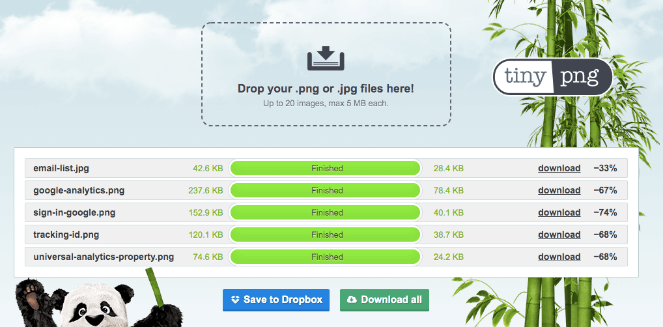
Our image, “sign-in-google.png” went from 159.9 kb to 40.1 kb. That’s 74% lighter than before!
All in all, this tool is fast and easy to use before uploading images to WordPress. They’ll be much lighter and faster with this compression tool.
3. Image Editor Tool – Canva
Popular image editing tools like photoshop are an amazing way to design images, but these tools aren’t for everyone. Most of them are built for photographers and graphic designers.
You might want something more beginner-friendly and affordable. If this is you, then we recommend Canva.
Canva is a great photo editing tool for any non-designer out there. And it’s free!

With Canva, you can create animated designs, infographics, social media images… you name it.
You can also:
- Resize images
- Add text and icons to images
- Create images from scratch
- Use Canva’s template gallery
- Compress images when you download
4. Stock Images – Shutterstock
A great way to find high-quality stock photos is with Shutterstock.

Shutterstock has thousands of photos and videos to choose from. You can find both realistic and animated images here.
For example, let’s say you need an image for your health and fitness blog.

Look at all these great options! Each photo is engaging, high-quality, and fun to look at.
Even better, all of our Blog Tyrant readers get one month free of Shutterstock! To get access, all you have to do is click on our link below:
5. Display Images – Instagram Feed Pro
There will be moments where the last thing you want to do is optimize images. It’s an important part of SEO…but it also takes time.
At the same time, photos look great on a blog—the more, the better! So why not add more images to your site with Smash Balloon’s Instagram Feed Pro?

With Instagram Feed Pro, you can display your Instagram posts to your site. This way you’ll always have a feed of images on your site, without the extra work.
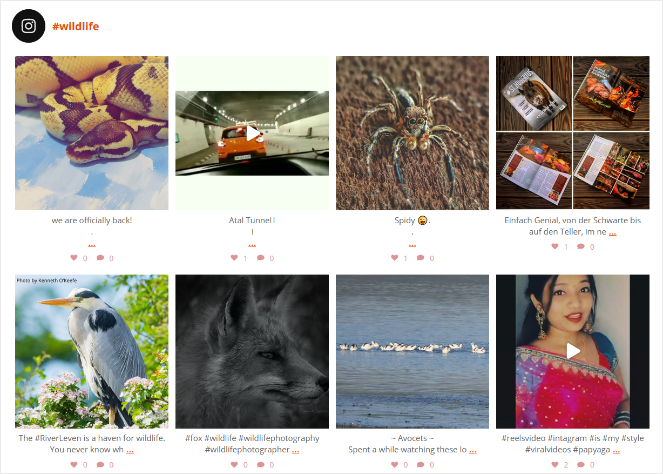
Plus, Instagram Feed Pro is built for image SEO. When you display your photos, Google can crawl and index your image captions and alt text.
With this plugin, you can post:
- A standard Instagram feed
- An Instagram hashtag feed
- An Instagram custom feed
And you’re not limited to one Instagram feed. With this plugin, you can post multiple Instagram feeds on your blog! Check out our guide on how to display an Instagram hashtag feed on WordPress to get started.
And you’ve made it to the end of this post!
Now you know what image SEO is and how to apply it to your blog. When you follow these tips, your site will be more optimized for SEO and speed!
If you liked this post, you should check out our ultimate guide to Instagram for bloggers too.
And don’t forget to subscribe to our newsletter!


Wow, This is an amazing post. I have never come across a more informative post. My site uses a ton of images and I know it slows it down. I also learned something about alt tags. I use them, but I was not 1005 sure about writing them.
Thank You