
H ave you been wondering how to start a membership site? In this article, we’ll show you how to create a membership site, step by step, so that you can generate recurring revenue online.
When you start a blog, it can be difficult to figure out how to make a steady income with it. Monetizing your blog with tactics like affiliate marketing, displaying ads, or selling digital products takes some work—and there are some months where your income will be lower than others.
But, with a membership site, you can set up a steady stream of income for yourself.
So, let’s take a look at how to start a membership site, step by step.
In This Guide:
What is a Membership Site?
A membership site is a website where some or all of the content is kept behind a “locked door.” Only registered members have the “key” and are able to access your content.
You can either require users to pay a fee in order to access your content. Or, you can simply require them to register an account for free.
There are a number of benefits of moving to the membership model. With a membership site you can:
- Generate recurring revenue from selling membership subscriptions
- Sell products via a monthly membership fee (or 1-time fee)
- Get more highly-engaged email subscribers
- Establish yourself as a leader in your industry by putting your content behind a paywall
Now that you know what a membership site is, do you need a better idea of what you could offer with your membership site?
Check out some of the membership site ideas in the next section.
Membership Site Ideas (with Examples)
If you’re interested in starting a membership site, you might be looking for some membership site ideas for inspiration.
Luckily, there are many different types of content you can offer on your membership site and there’s a ton of successful membership sites online to spark your imagination.
Check out these profitable membership site ideas:
1. Written Content
Something you can offer on your membership is a content library of expert, in-depth written content like blog posts or ebooks.
For example, on CopyBlogger, members can get access to premium content that will help them learn more about content marketing. This membership site offers a ton of ebooks on topics such as writing headlines, promoting your content, keyword research, email marketing, and much more.
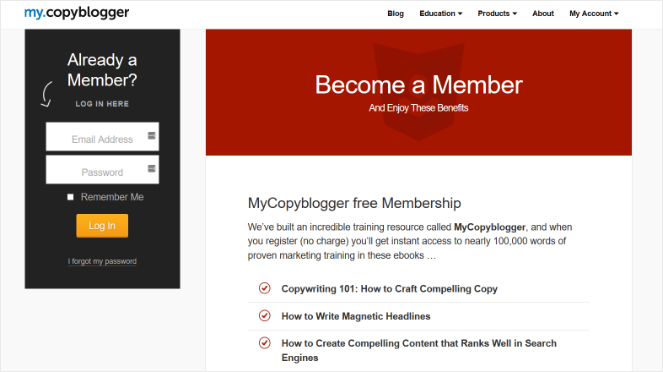
Written content like premium blog posts, PDF guides, and ebooks are easy to create, especially if you’re already creating content for your blog.
Creating this type of membership site is super easy if you’re already blogging.
Just be sure to update your membership site with new content on a regular basis. This will keep your members engaged and encourage them to return to your site over and over again.
2. Video Content
Instead of written content, you could also provide video content on your membership site.
Video is the most popular type of content online these days. People love video because it’s engaging and they can watch or listen to it while they’re doing other tasks.
A successful example of this is Study Gateway. Study Gateway is a successful membership site that offers video bible lessons to its members.

You don’t need an expensive camera or a film crew to create videos for your membership site. You can take pretty great videos with a smartphone or a webcam these days.
Aside from pre-recorded videos, you could also offer live video chats or webinars so that you can interact with your site members in real-time.
3. Online Community or Forum
People love being a part of an exclusive group or club where they can connect with like-minded people. So, creating an online community or forum is a great idea for your membership site.
Quiet Speculation is a membership site for players of the game Magic: The Gathering. Quiet Speculation offers a members-only Discord chat on their website where players can offer tips and tricks to each other.

This a great way to build a strong, loyal, and connected online community.
4. Online Courses
Online courses are super popular because many people are interested in learning new skills in an affordable and convenient way. So, if you’ve got extensive knowledge in a particular subject, consider offering online courses on your membership site.
The International Gem Society offers online courses and certifications for gem enthusiasts in their membership site.

Along with online courses, The International Gem Society also offers over 1500 articles and an online community to its members.
Which brings us to the next membership site idea…
5. A Variety of Content
It’s wise to start your membership site off by offering just 1 of the ideas above to your members. This will make it easier for you to manage. But, as your site grows, consider offering multiple types of members-only content to your audience.
Like the International Gem Society, you can offer written content, online courses, an online community, and more on your membership site.
When you offer different things on your membership site, you can create different membership levels. Each membership level can offer particular content at a certain price.
For example, with the lowest membership level, members can get access to premium written content. With a middle membership level, members can get access to written content and extra courses. And with the highest membership level, members get access to all of those perks, plus they get access to a members-only community or forum.
You can set up your membership levels however you want, depending on what you offer on your site.
Hopefully, you have an idea of what to include in a membership site now. So, let’s jump right into the tutorial on how to start a membership site.
What You Need to Start a Membership Site
In order to start your own membership site, you need the following:
- Domain Name – A domain name is your website’s address, like www.blogtyrant.com.
- Web Hosting – A web hosting service is where your website files are stored.
- SSL Certificate – This enables you to securely accept online payments.
- Membership Software – Membership software, like the best WordPress membership plugin, lets you easily convert your existing website into a membership site.
Step 1: Set up a WordPress Site
If you already have a self-hosted WordPress website, you can skip this step.
But if you don’t have a website yet, you’ll need to create one if you want to start a membership site, of course.
At Blog Tyrant, we always recommend creating a self-hosted site with WordPress.org. With a self-hosted WordPress.org site, you get unrestricted access to all of the tools you need to create a powerful website such as WordPress plugins.
With WordPress plugins, like a membership plugin, it’s easy to customize your website any way you want and add extra features to it.
We also recommend Bluehost for your web hosting platform. Bluehost offers reliable and affordable web hosting plans that include a free domain name, 1-click WordPress installation, a free SSL certificate, and more.

Plus, Blog Tyrant readers get an exclusive discount of 60% with Bluehost!
Exclusive offer for BlogTyrant readers
We have partnered up with Bluehost to get 60% off for our readers! You also get to register a FREE domain for a year which normally costs around $14.99 per year.
Claim this Exclusive Bluehost offerIf you don’t have a website yet, be sure to take advantage of this deal. This will help you create a membership website in no time and without spending a ton of money.
Check out our guide on how to install WordPress on Bluehost for step-by-step instructions on getting started. After you’ve completed this step, it’s time to start creating your membership site.
Let’s go!
Step 2: Pick a WordPress Membership Plugin
Next, you need to choose a WordPress membership plugin. A WordPress membership plugin makes it easy to transform your regular website into a membership site.
There are a number of WordPress membership plugins available, both free and paid.
But it’s important to choose a membership plugin that comes with all of the features and functionalities you need to start a profitable membership site—not all membership plugins offer them.
We recommend using MemberPress.
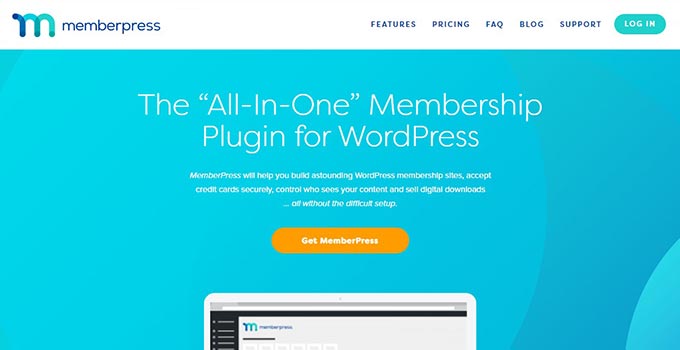
MemberPress is the best all-in-one membership plugin on the market and it comes with a ton of powerful features right out of the box.
Some standout features include:
- Easy setup
- Access rules for pages, posts, categories, and other files
- Premium community forums
- Create and sell online courses
- Built-in coupons to run giveaways and promotions
- Dynamic pricing pages
- Content dripping
- And much more
Here’s a guide on how to install a WordPress plugin if you need help.
Step 3: Set up Your Membership Plugin
After you’ve installed and activated the MemberPress plugin, it’s time to set it up. Don’t worry, MemberPress makes this easy.
After activating MemberPress, at the top of your WordPress dashboard you’ll see a notification about getting started with MemberPress.

This message includes links to adding a payment method, adding a membership, and adding a rule.
Let’s start by clicking the Adding a Payment Method link option.
(Adding a Payment Method can also be found in the Settings section, under the Payments tab.)
Step 4: Add a Payment Method
Adding a payment method is one of the most important steps in creating a membership site.
After all, if you want to generate recurring revenue from your site, you need a way for users to pay online.
To add a payment method, click on the (+) button underneath the Payment Methods section.

After clicking the button, a new section will appear where you can set up payments through PayPal, Authorize.net, and Stripe. Select the payment method you want to add and provide the required credentials.
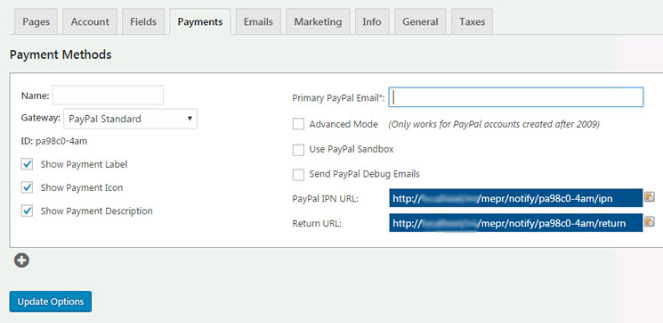
You can choose 1 payment method or multiple. Offering multiple payment methods is wise because some of your website visitors will prefer one method over the others.
Next, let’s create membership levels.
Step 5: Create Membership Levels
As we mentioned earlier, you can create multiple membership levels for users to purchase—options are awesome!
Each membership level can be a different price, offer different features, and give users access to particular content. You can also set up a free membership level to collect email addresses for your email marketing list.
To create membership levels in MemberPress, go to MemberPress » Memberships in your WordPress dashboard. Click the Add New button at the top of the page.
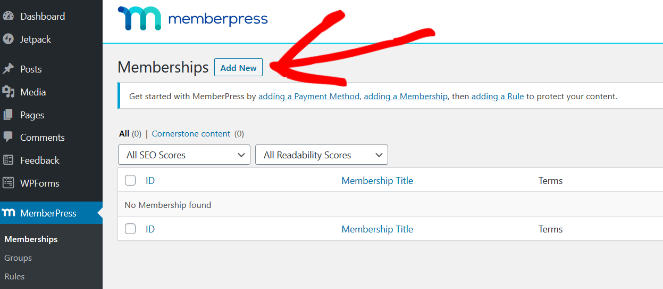
Then, you’ll see a page like this where you can create a new membership level:
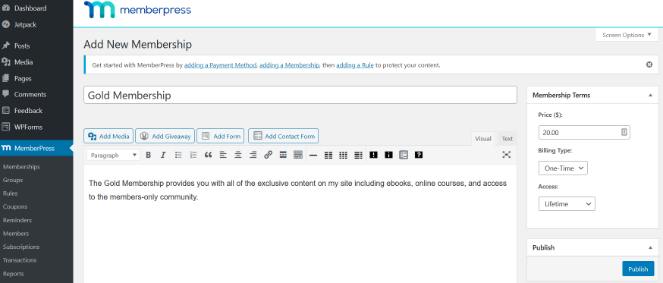
Here you can name your membership level and provide the details of what users will get with this level in the content editor below.
To the right of the page, you can also select the price of the level, billing type (1-time payment or recurring), how long the user has access for, and if you will accept renewals.
Next, scroll down to the Membership Options section. In this area, you can customize permissions and membership options for this membership level.
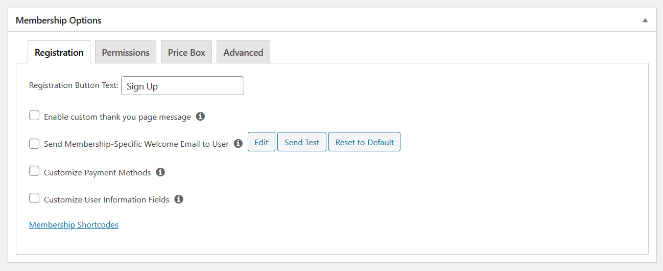
When you’re happy with your membership level, click the Publish button.
You can repeat the same process for all of your membership levels.
Step 6: Set Up Access Rules for Your Membership Levels
Next, you have to decide which content on your site is going to be accessible via each different membership level you created.
So, you need to set up access rules.
To set up access rules, go to MemberPress » Rules, then click the Add New button.
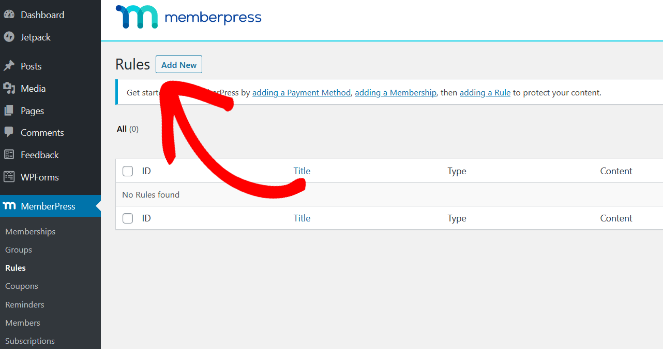
Now you can create a rule to associate your content with your membership levels.
For example, you can choose all of your content with a particular tag (like “premium”) to be available only to users with a Gold membership plan.
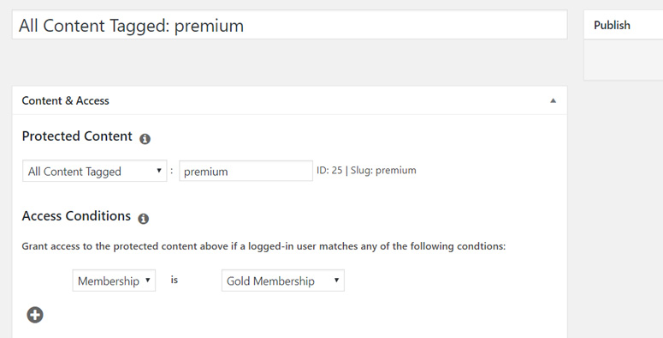
Setting up access rules like this prevents members with the free plan from accessing content that’s only meant for members that are paying for the highest membership plan.
You can also create more specific rules such as restricting access to a single post, page, or specific URL.
At the bottom of the page, you can also enable Drip.

Dripping your content lets you release content to users gradually over a period of time, instead of giving them access to it all at once. You can also set an expiration date so that the content becomes completely unavailable after a certain time.
Once you’ve finished setting up your access rules, hit the Save Rule button.
If you need to create more rules for your membership plans, repeat the process.
Step 7: Create Members-Only Content
In the step above, we created a rule that all content tagged “premium” is only available to users that have subscribed to the “Gold” membership plan.
Now it’s time to actually create that members-only content.
Luckily, MemberPress makes this super easy.
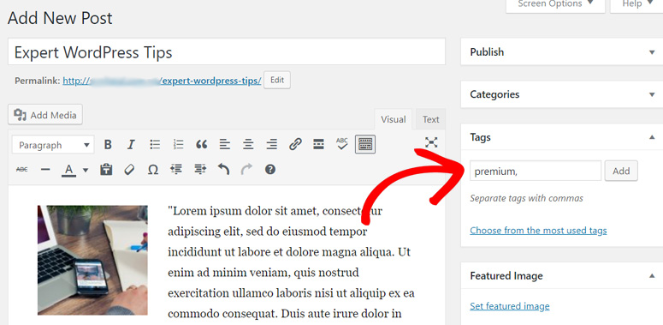
You can create exclusive blog posts in the WordPress editor like you normally would and simply add the tag “premium” to the Tags section.
Or, you can add the “premium” tag to any of your existing blog posts or pages.
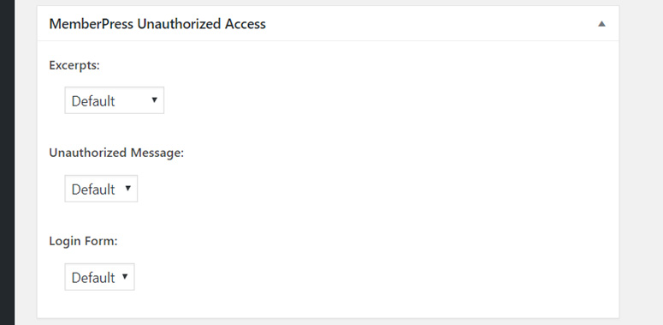
In the MemberPress Unauthorized Access section at the bottom of the page, you can also choose what non-members will see when they try to access this content.
There are options for showing an excerpt of the post, an unauthorized message, and a login form. You can choose the default settings for these or create your own custom options.
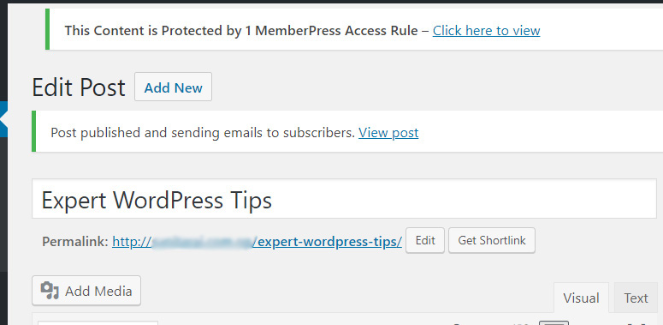
After tagging your members-only content and setting the unauthorized access settings, click the Publish button.
Once the members-only content is published, a success message will appear at the top of the screen:
Step 8: Create a Pricing Page
Now you need to create a pricing page. This is this landing page where people can sign up for your membership plans. It should show the different membership levels you offer and price point for each. Users will be able to select a membership level and then move on to the payment page.
To create a pricing page, go to MemberPress » Groups. Then, click Add New at the top of the page.
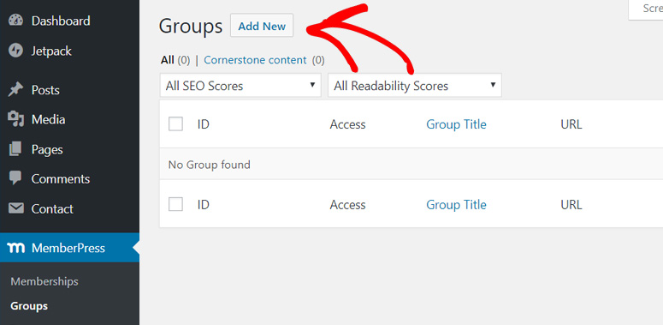
First, add a title for the page, such as “Membership Plans” or “Pricing Plans”.
Next, scroll down to the Group Options box and add the membership levels you want to show on the pricing page.
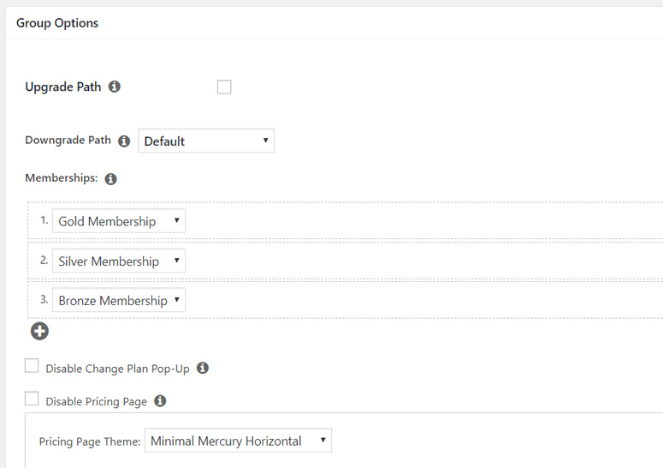
MemberPress comes with pre-made pricing page templates so you can create a professional-looking pricing page in no time.
Here’s an example of what your membership site’s pricing page could look like:
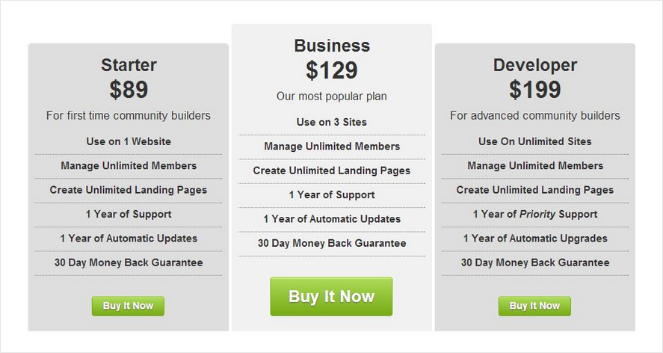
Once you’re done creating your pricing page, click Publish.
Step 9: Redirect Users to Your Pricing Page
Next, you’ll want to redirect unauthorized users (non-members) to your pricing page. This will help you turn more website visitors into members, which means more revenue for you.
To do this, go to MemberPress » Groups and copy the URL of the pricing page you just created in the previous step.
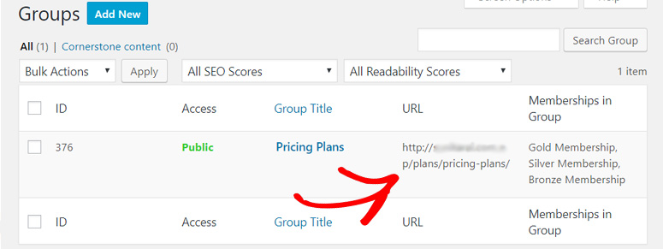
Next, go to MemberPress » Options and head to the Unauthorized Access section near the bottom of the page.
Check the box next to Redirect unauthorized visitors to a specific URL and paste the pricing page URL you copied earlier.
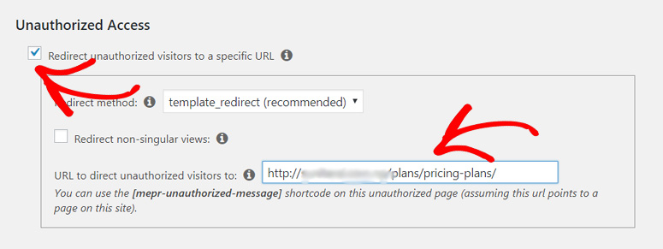
Click Update Options to save.
Now, any time a non-member tries to access your premium content, they’ll be redirected to your pricing page to encourage them to sign up.
Step 10: Add Sign up and Login Forms
Lastly, you need to add sign up and login forms on your website. This will make it easy for visitors to sign up for your membership site and easy for existing members to log in and view your exclusive content.
Start by adding the pricing page link to your website’s navigation menu. To do this, go to Appearance » Menus in your WordPress dashboard.
Click on the Groups tab on the left side to expand it. Add a checkmark to the pricing page you just created and click the Add to Menu button.
On the right side, you can double-check that you’ve selected the correct menu to add your pricing page to.
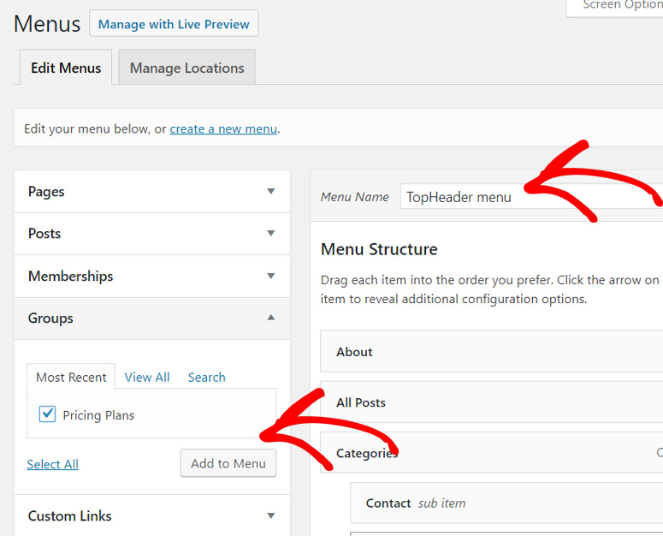
Once that’s done, your pricing page will appear on the right underneath the Menu Structure section. You can rearrange the order of the pages in your menu by dragging and dropping them into place.
Click the Save Menu button to save the changes you made.
Now, new visitors to your site can easily find the page where they can sign up.
Next, add a login form for your existing members.
To do this, go to Appearance » Widgets in your WordPress dashboard and add a MemberPress Login widget to your sidebar.
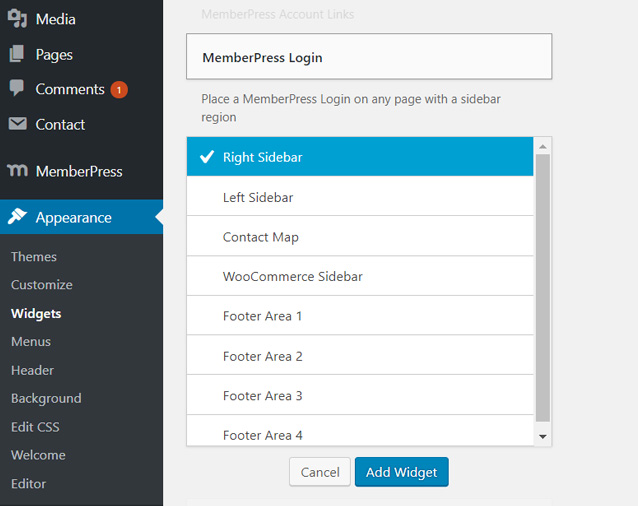
Click the Save button. Now your members have an easy way to login to your membership site.
That’s it! You’ve created a fully functional membership site!
But wait, your job isn’t done yet…
Bonus Step: Grow Your Membership Site
While your membership site may be all set up and ready to go, your work isn’t done. Running a successful membership site isn’t as simple as putting up a website and waiting for the magic to happen—you have to do some work.
First, it’s important to promote your membership site. Promoting your membership site online will help your membership site grow and get more members.
There’s a number of easy ways to promote your membership site, like:
- Posting about it on social media
- Creating a Facebook group for your membership site
- Announcing it to your email subscribers
- Running a giveaway with a free membership as the prize
You can also use a tool like OptinMonster to generate more leads for your membership site. By creating a lead generation campaign, similar to the one below, you can encourage your site visitors to sign up for a membership plan.
For example, membership site Expat.com used OptinMonster to grow its community by 30,000 members every month!

Other tools that will help you manage and grow your membership site, include:
- MonsterInsights – Makes it easy to set up Google Analytics on your WordPress site. This will help you track how many visitors your site has, how they’re finding you online, and more.
- WPForms – Add a contact form to your website so potential members and existing members can reach you if they have questions. You can also create surveys to find out what your members want to see on your site.
- TrustPulse – Shows real-time notifications every time someone becomes a member. This is a form of social proof and it encourages other users to sign up too.
- Uncanny Automator – Automate your membership site and slash admin time by connecting MemberPress with other plugins. For example, when someone cancels their membership, Uncanny Automator will automatically unsubscribe them from your email marketing audience.
Start Your Membership Site Today
We hope this post showed you how to easily start a membership site. So, what are you waiting for? Start your membership site today!
Once your site is up and running, and you’re promoting your membership plans to your audience, you should have a steady stream of new members wanting to get their hands on your exclusive content. And with those (paying) members, you can generate recurring income online.
If you liked this post, check out our guide on smart ways to make money online.
Want more tips like these? Make sure to subscribe to our email newsletter so you can get the expert advice you need to grow your blog.


Great tips here. Especially the adding a signup page. I am familiar with at least two websites who offer premium content via membership that doesn’t display the signup process. I think that’s a missed opportunity.
On another note, would you recommend a membership site for a brand new website with no following>?
You can definitely start a membership site from scratch even with no following! You can include premium content, courses, etc. Then as your membership grows, you might consider adding community features like forums.
To grow your traffic and memberships, check out this tutorial: https://www.blogtyrant.com/get-more-traffic/
And here’s a case study on a membership site you might find useful as well: https://optinmonster.com/case-study-expat-com-grows-30000-members-month/
Cool. Thanks Keri. I’ll add it to my reading list.
Wonderful information you have shared for us. Thank you.
I’m still learning from you, but I’m improving myself. I absolutely love reading all that is posted on your website.Keep the tips coming. I loved it!