
W ondering how to add a photo gallery to your blog? In this tutorial, I'll show you 3 easy methods to add a photo gallery in WordPress.
If you run a blog, displaying photos is a must. Nobody likes reading pages after pages of plain text. By adding photos to your blog, you can maximize the attention of your readers and boost engagement.
And photo galleries are a great way to display multiple eye-catching photos in an organized way.
In this tutorial, we’ll show you how to make a photo gallery in WordPress, step-by-step, using 3 simple methods.
Let’s get started.
Key Takeaways To Create An Image Gallery In WordPress
In This Guide:
Before diving into the tutorial, let’s look at a few benefits of adding an image gallery to WordPress.
Why Should You Add An Image Gallery To WordPress?
Every blog needs images to create a great reading experience for visitors. But, some types of blogs need to add more images than others.
For example, a photography blogger will need to display lots of photos on their site to show off their portfolio of work. And a travel blog will likely want to add many images from their recent trips.
Image galleries make it easy to display these photos in a neat and tidy format.
When you add multiple images to a post or page, they appear one after another with lots of blank space in between. This looks messy and unappealing and requires lots of scrolling to get past all the photos.
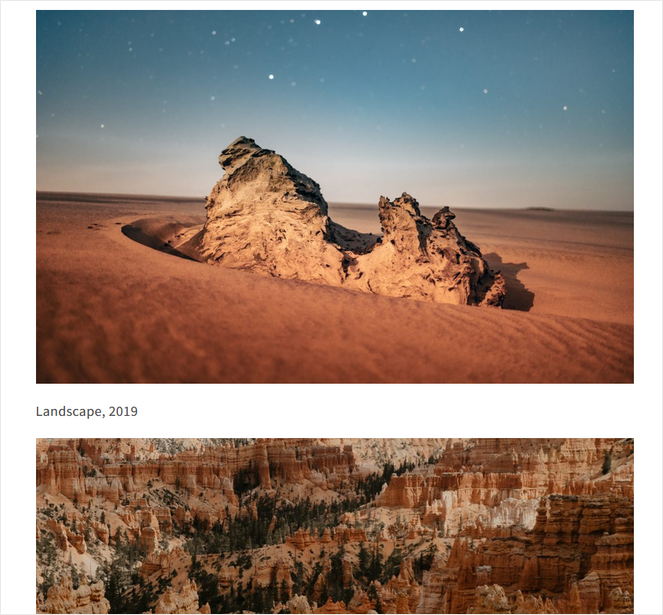
A photo gallery displays your images in columns or grids for a clean, professional look that attracts visitors and keeps them on your blog. Properly organized photo galleries also make it easier to find specific pictures.
Here’s how a photo gallery looks on photographer Alice Zilberberg’s blog:
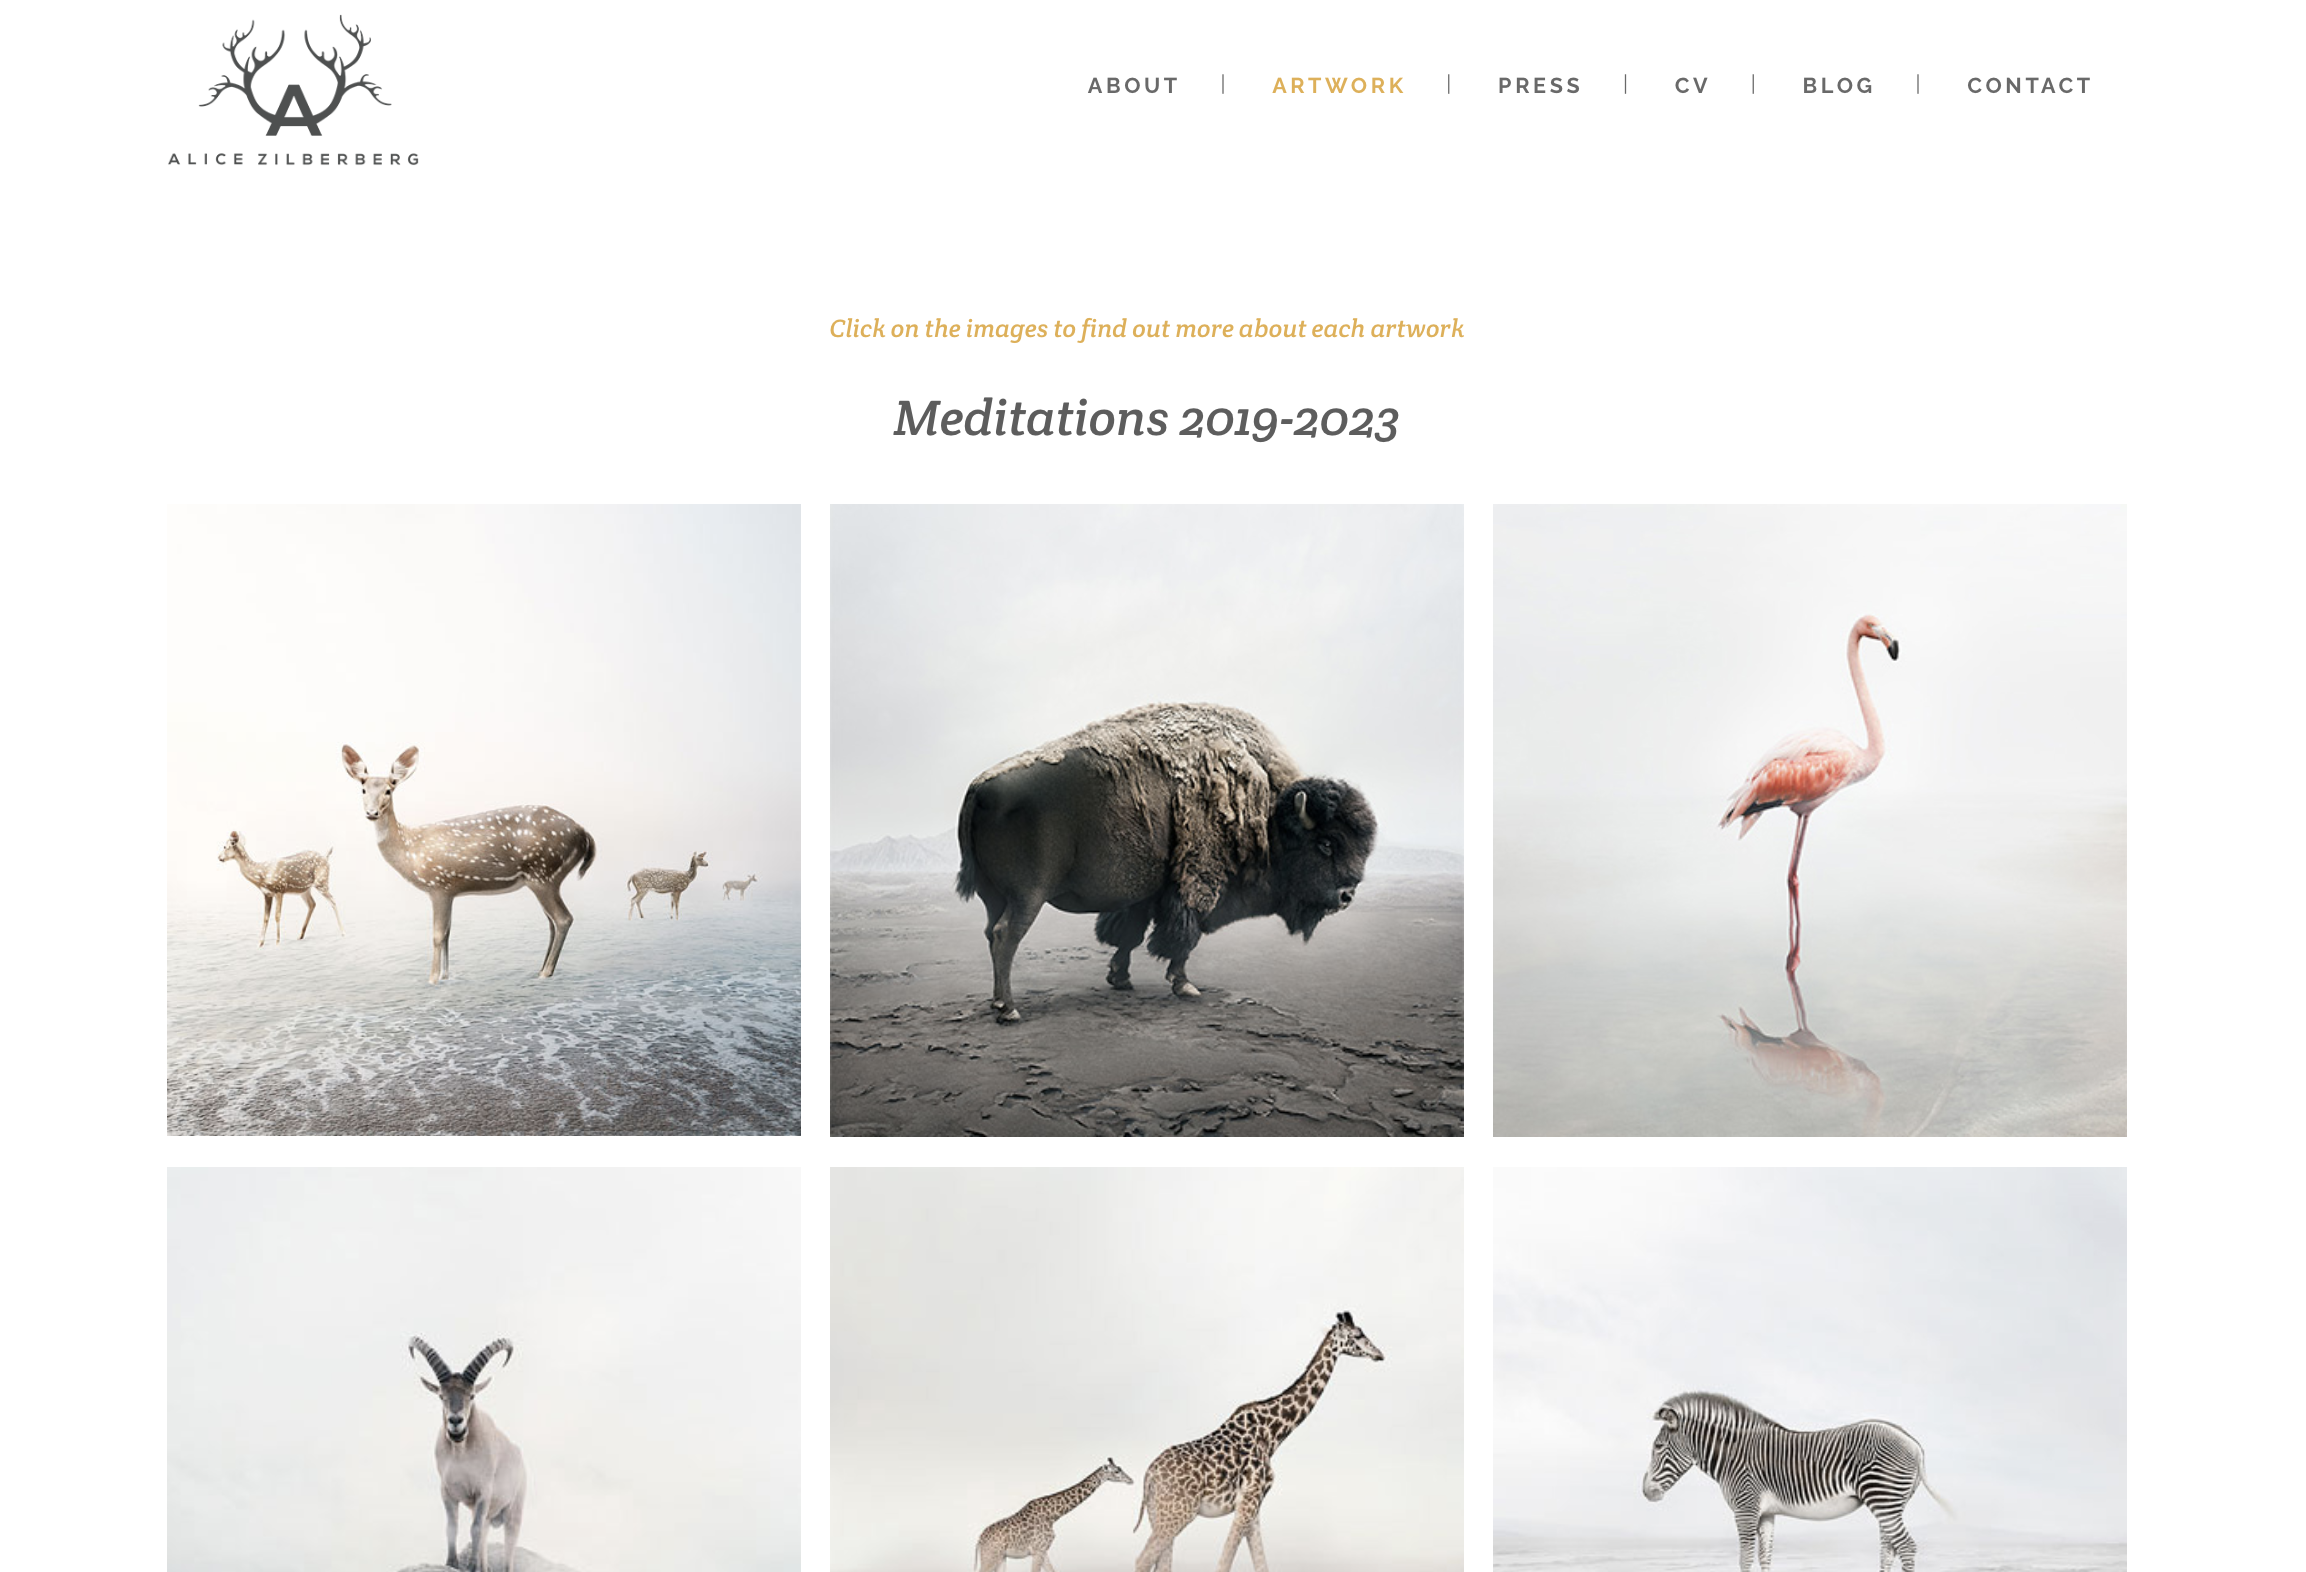
Aside from organizing your images in a visually-appealing way, a WordPress gallery also comes with other benefits including:
- Improve SEO – Google factors images and galleries in SEO rankings. With image galleries, your blog can rank higher in Google.
- Showcase Products – If you have an online store, an image gallery lets you showcase many products.
- Display Social Proof – Use galleries to show off customer photos or testimonials to build social proof.
- Build Trust – With a more professional-looking blog, visitors will come to trust your brand and become loyal readers, subscribers, and customers.
- More Social Shares – Many WordPress photo gallery plugins have built-in social sharing features. That means you can boost social shares for your content and attract more traffic to your blog.
Now that we know the importance of WordPress image galleries let’s explore the first way to create a photo gallery in WordPress.
Method 1. Make a Photo Gallery with Smash Balloon Instagram Feed Pro
For the first tutorial, I’ll show you how to create a WordPress image gallery using Smash Balloon’s Instagram Feed Pro.
Built by Smash Balloon, Instagram Feed Pro is one of the best gallery plugins for WordPress on the market. Within minutes, you can create stunning Instagram image galleries for your website to boost engagement and spice up your blog.
This plugin is 100% responsive and doesn’t require any coding, making it perfect for beginners. It also has endless customization options, so you can design your photo feeds to match your WordPress theme and branding.
The best part of Instagram Feed Pro? You can take photos already uploaded on your Instagram account and automatically display them on your WordPress site. This saves you the trouble of having to upload photos twice and keeps your site updated with fresh visual content.
It’s a real time-saver and a beautiful, easy way to add a gallery in WordPress.
Let’s get started with the tutorial.
(And if it’ll be helpful for you, check out this great video overview!)
Step 1: Install & Activate Instagram Feed Pro Gallery Plugin
First, you’ll need to install and activate the Instagram Feed Pro plugin in WordPress. Installing this plugin only takes a few minutes and is very simple.
If you need help, check out our guide on how to install a WordPress plugin.
Note: For this tutorial, we’ll be using the premium version of Smash Balloon that comes with advanced features for making a gallery. But, you can also try out the free version of the plugin to get started.
Step 2: Connect Your Instagram Account
Once you’ve installed and activated the plugin, you need to connect it to your Instagram account.
To do this, go to Instagram Feed » Settings. Then, click the Connect an Instagram Account button.
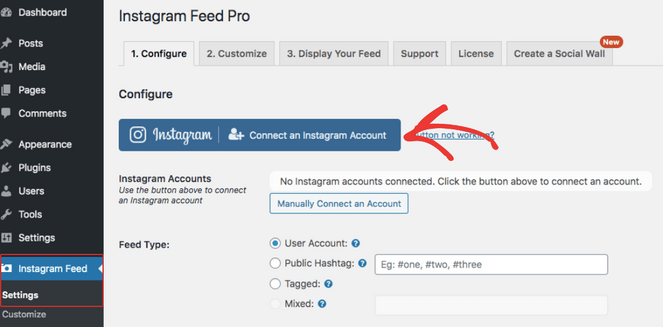
Then, select between a Personal or Business account and click Connect:
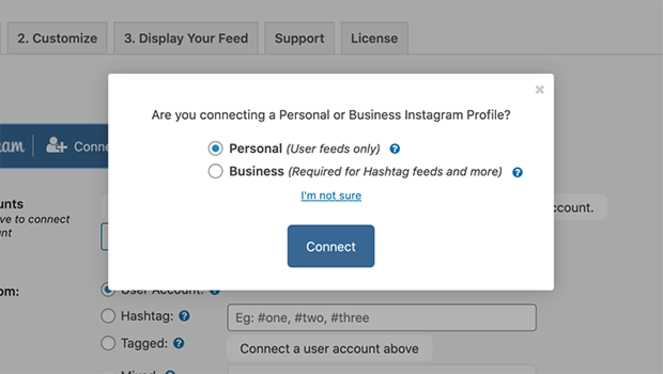
Personal accounts will only display Instagram galleries from your user feed. Business accounts will display user feeds, hashtag feed galleries, and more.
Next, the plugin will prompt you to log in to your Instagram account in order to connect it with Smash Balloon.
After it’s connected, you can move on to the next step…
Step 3: Choose a Gallery Type
Now, you need to choose the type of gallery you want to embed on your site.
You can choose between 4 different gallery templates:
- User Account: Displays a gallery of photos from an Instagram account you own.
- Public Hashtag: Displays a gallery of public photos from a hashtag instead of an account.
- Tagged: Displays a gallery of photos your Instagram profile is tagged in.
- Mixed: Displays all of the above types in one gallery.
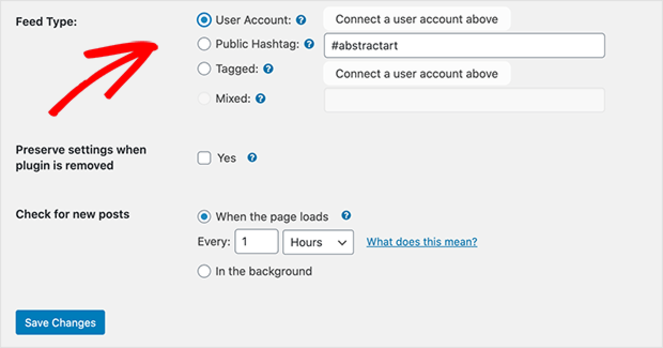
When you’re done, save your changes.
Step 4: Choose Your Gallery Layout
Now, you need to choose a layout from your gallery options.
Go to Instagram Feed » Customize and scroll down to the Layout section:
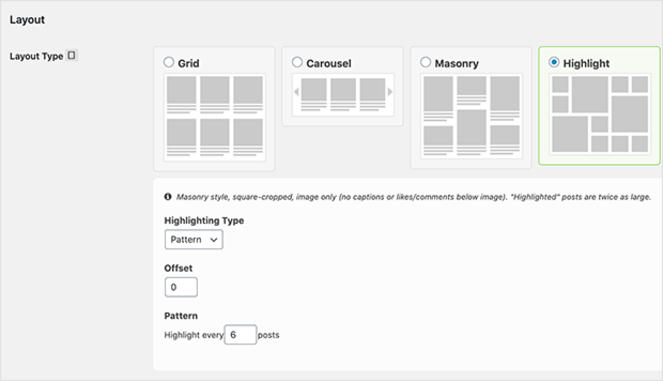
Here, you can choose between 4 gallery layout types: Grid, Carousel, Masonry, and Highlight.
Let’s take a look at what each one looks like:
Grid Layout

The grid layout displays your photos as a uniform grid of images.
You can show or hide captions, likes, and comments as well as choose how many photos and columns to showcase on this tiled gallery block.
Carousel Layout
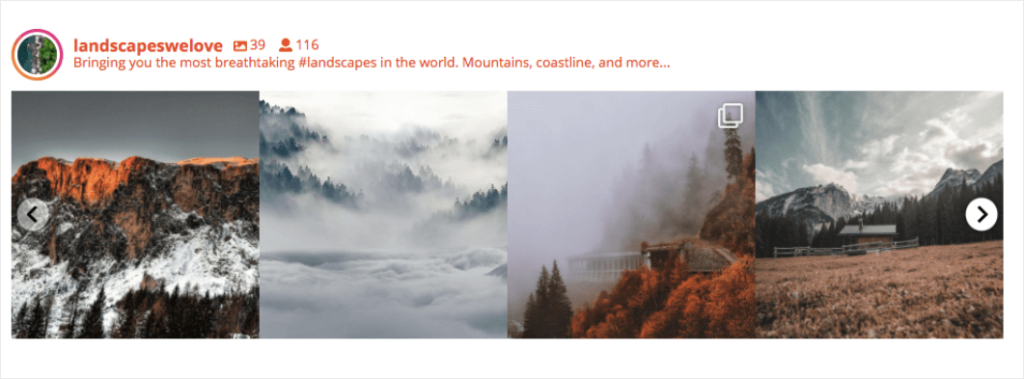
The carousel gallery layout displays your photos as a horizontal slideshow. Depending on how much social content you want to share, you can choose the number of columns and rows to show.
You can also:
- Show or hide pagination,
- Navigation arrows,
- And turn on autoplay.
Masonry Layout
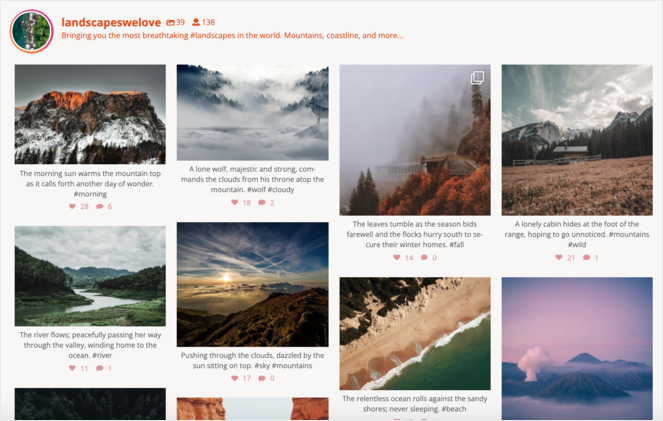
The masonry gallery layout displays your photos in their original size.
It prevents your images from getting cropped to a uniform size, which can be a good option for bloggers that want to show everything.
You can set the number of images and columns to display for both desktop and mobile.
Highlight Layout

The Highlight gallery layout allows you to highlight certain posts so that your most popular content stands out. You can choose a Highlight photo based on pattern, post ID, or hashtag. You can also set the number of posts and columns to display.
After you’ve selected the layout you want, you can customize your header options in the next section.
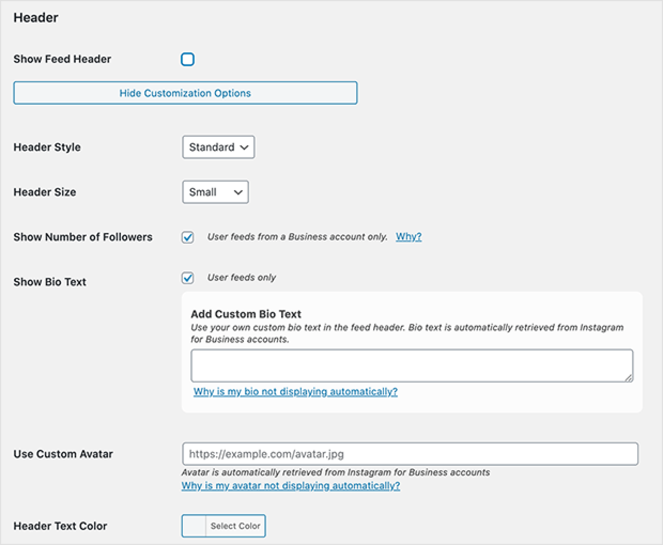
You can choose between a standard, boxed, or centered header style and pick a header size. Add bio text, show or hide the number of followers you have, and alter the header text color.
You can show the ‘Load More’ button in the next section. This button will be added to the bottom of your gallery and will load more images from your Instagram.
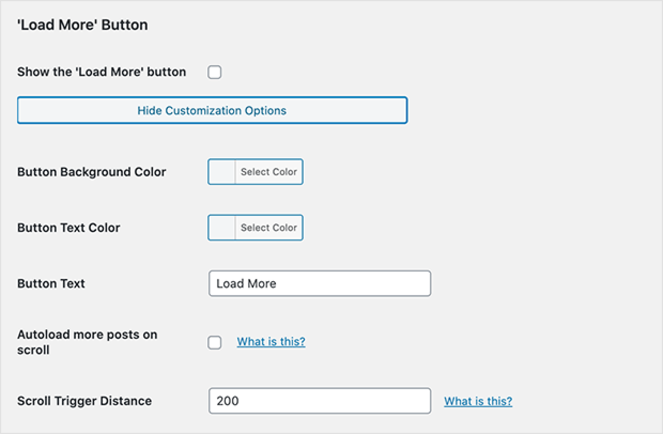
You can also change the button background color, text color, button text, and more.
In the final section, you can add a ‘Follow’ button that’ll appear below the gallery so visitors can follow you on Instagram.

You can change the button background color, text color, and button text.
When you’re done customizing your gallery, click Save Changes.
Step 5: Select Information to Display
Next, you’ll have to select the information you want to display in your gallery.
Click the Posts tab at the top of the Customizations page:

Here, there are 5 different links you can click to customize your settings:
- Photos: Sort your photos by random, likes, or newest to oldest. Set your image size and choose the photos you want to show. You can link posts to a URL in the image captions so visitors can shop through your gallery as well.
- Photo Hover Style: Choose the hover background, text color, and what information to show when visitors hover over a gallery photo.
- Caption: Show or hide captions and choose caption length, text color, and size.
- Likes & Comments Icons: Show or hide icons for comments and likes as well as customize the icon color and size.
- Lightbox Comments: You can allow comments in photo lightboxes, clear your comment cache, and set the maximum number of comments users can leave.
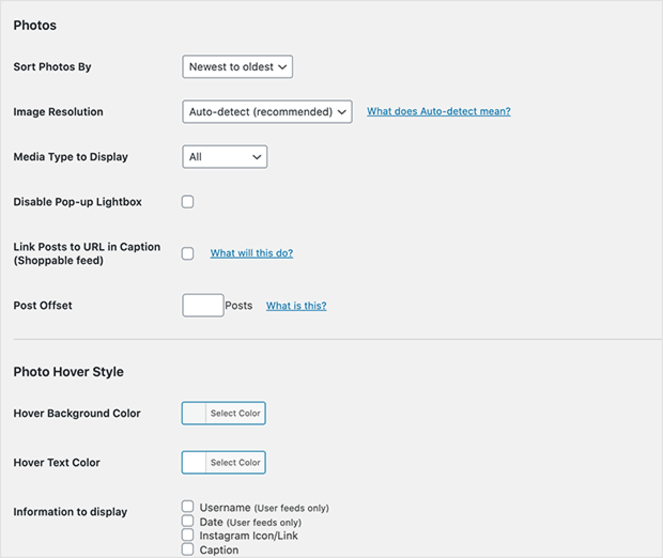
When you’re done picking out your options and customizations, click Save Changes.
Step 6: Embed Your Gallery in WordPress
Now, it’s time to embed your Instagram gallery in WordPress.
There are a few different ways you can embed an image gallery in WordPress:
- The Instagram Feed block for the new WordPress Gutenberg block editor
- With a Shortcode for the classic WordPress editor
- The Instagram Feed WordPress widget to display in your site’s sidebar
I’ll go over each method so you can decide how you want to embed your gallery.
WordPress Block Editor
First, we’ll show you how to embed your gallery in the WordPress block editor.
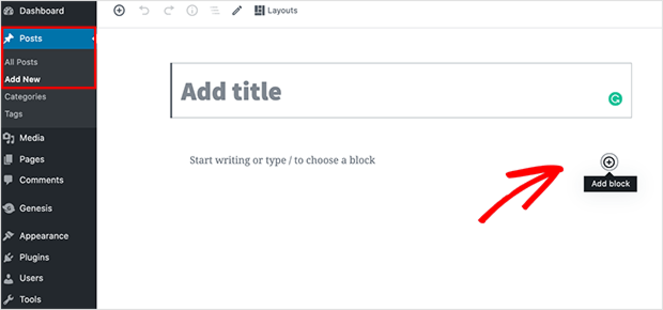
Go to Posts » Add New. Here, you’ll see the editor and a new post. When you click the Plus (+) icon, you’ll be able to search and choose a block to add to the editor.
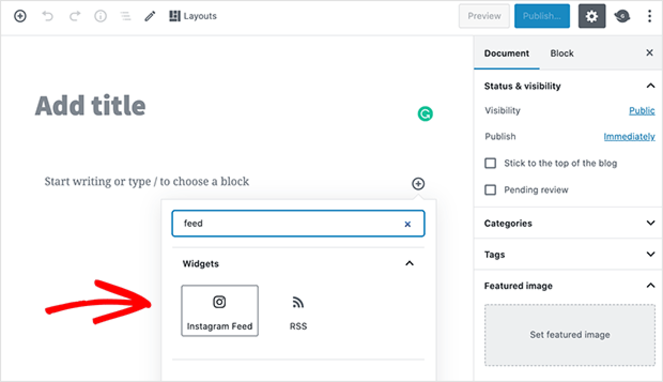
Type “feed” in the search bar and select the Instagram Feed block:
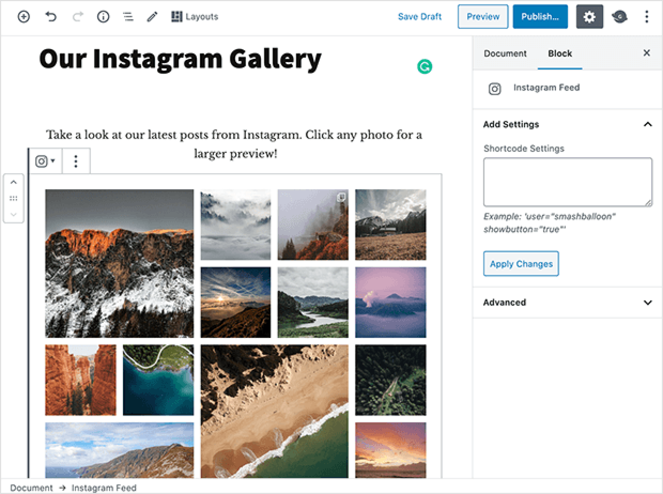
Click the block to add it to your post and see your Instagram feed displayed:
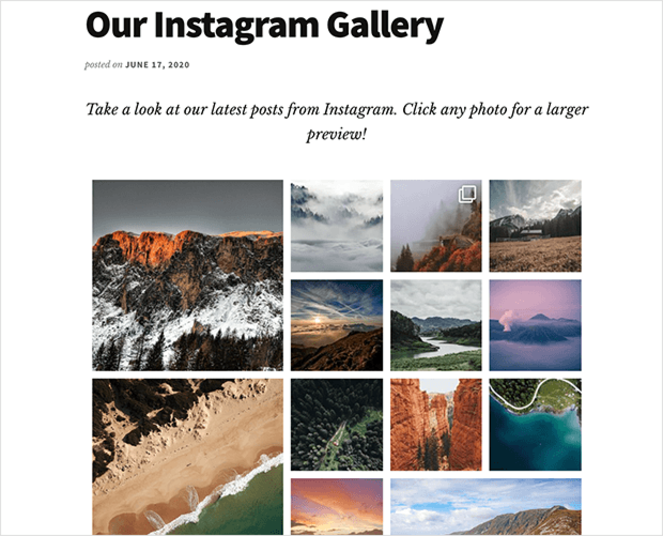
By clicking Preview, you can view your new gallery and see what it looks like for visitors:
Classic WordPress Editor
For the second method, you can use the classic WordPress editor by embedding a shortcode.
From your WordPress dashboard, click Pages » Add New.
Then, paste the shortcode in the editor:
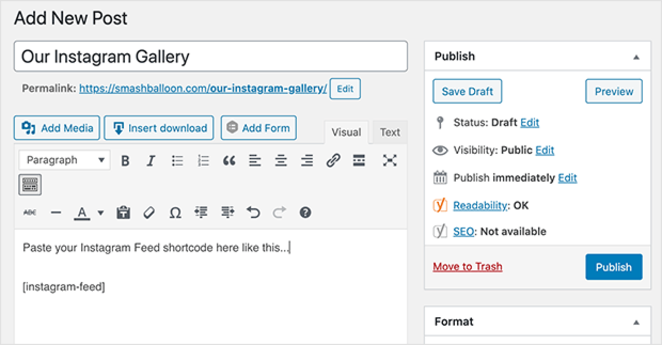
Click Publish and your gallery will go live.
Instagram Feed WordPress Widget
For the final method, you can use a widget to embed your Instagram gallery in your WordPress sidebar.
From your WordPress dashboard, go to Appearance » Widgets. Then, scroll to the sidebar or footer section where you want to add the gallery and click on the (+) button.
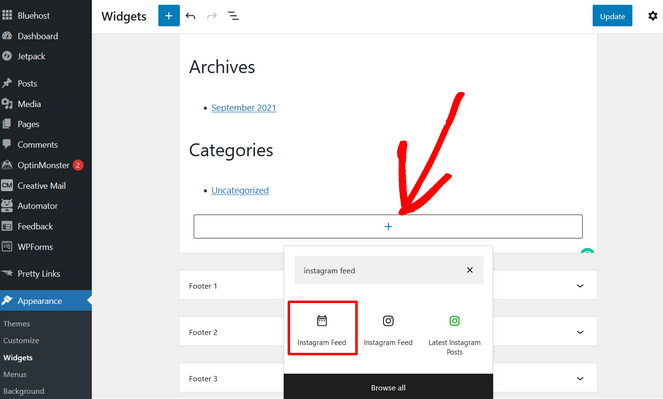
Search for the Instagram Feed widget and click on it to add it to your sidebar.
Remember to save your settings. When you preview your gallery, it’ll look something like this:
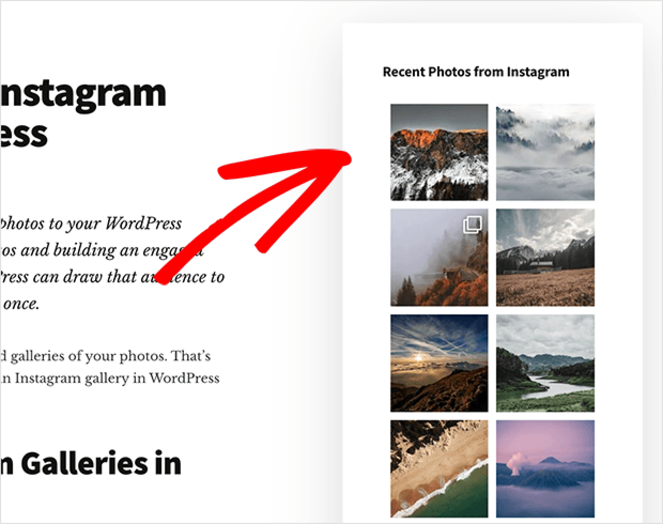
And that’s how you create and embed an Instagram gallery in WordPress using Instagram Feed Pro.
Want to create a video gallery with Smash Balloon? Check out our tutorial on how to embed a YouTube playlist in WordPress for more information.
Next, I’ll show you how to create a gallery with a different WordPress photo gallery plugin.
Method 2. Create A Gallery With Envira Gallery Plugin
To make a photo gallery in WordPress, you can also use Envira Gallery.
Envira Gallery is another highly popular WordPress gallery plugin.
It comes with a user-friendly drag-and-drop builder that makes it easy to create and display your images exactly how you want.
Envira Gallery is 100% mobile responsive and comes with pre-built templates, so it’s quick and simple to customize your gallery’s aesthetic.
The plugin provides plenty of features to increase your gallery functionality, such as image optimization, standalone galleries, watermarking, and more.
Let’s get started with the tutorial.
Step 1: Create a New Envira Gallery
First, you’ll need to install and activate the Envira Gallery plugin in WordPress.
Once you’re finished setting up, click Envira Gallery » Add New from your WordPress dashboard to create a new gallery:
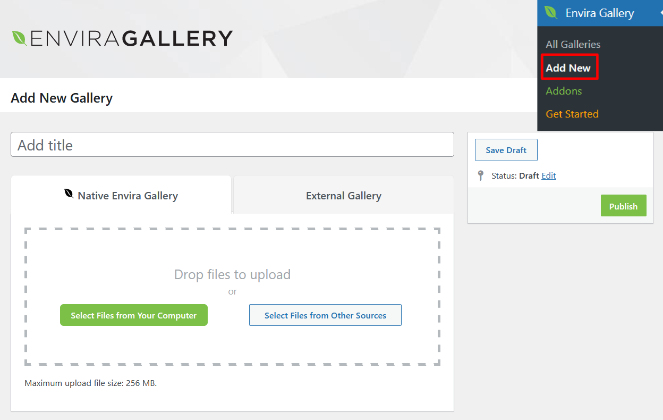
Add a title and click Select Files from Your Computer to upload your images. You can also select files from your WordPress media library by clicking on Select Files from Other Sources.
When you upload your images, they’ll appear under the Gallery tab:
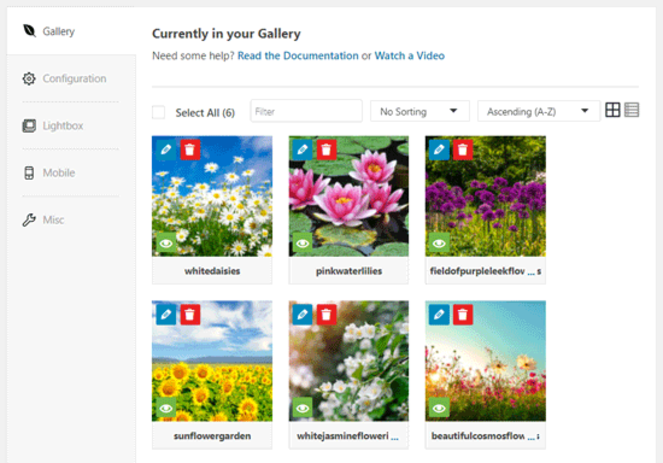
Clicking on the blue pencil icon will allow you to add a caption, title, and alt text for each image.
Step 2: Configure Your Gallery Settings
Next, click on the Configuration tab:

Here, you can change your gallery settings, including title and caption positions, number of columns, heights, margins, thumbnail dimensions, image lazy loading, image dimensions, and more.
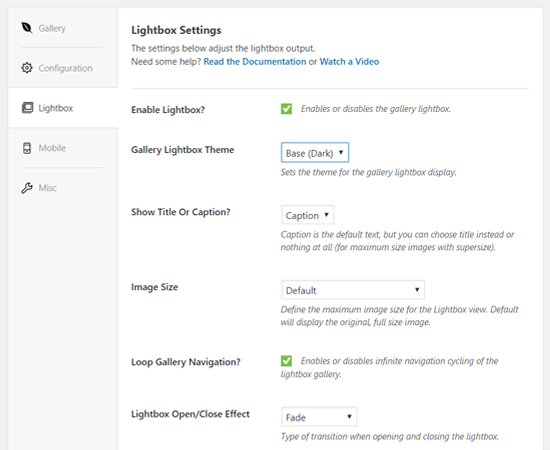
Now, click the Lightbox tab underneath Configuration.
On this page, you’ll see the settings for the lightbox:
Here, you can enable the lightbox, which allows users to enlarge an image and view it from the same page, choose a theme, show a title or caption, and more.
Now, click the Mobile tab:
Under Mobile Gallery settings, you can enable specific images for mobile devices, choose mobile dimensions, enable titles and captions, and more.
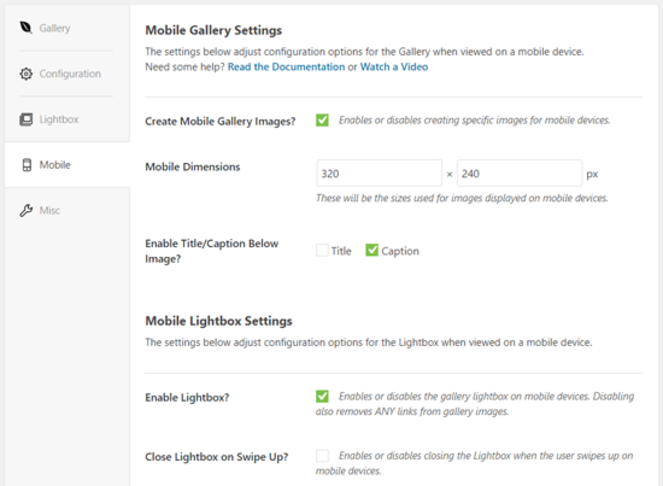
Under the Misc tab, you can also write a custom CSS code and slug to add to your gallery.
Step 3: Publish Your Gallery
Once you’re finished configuring these settings, you can publish your Envira gallery anywhere on your WordPress site.
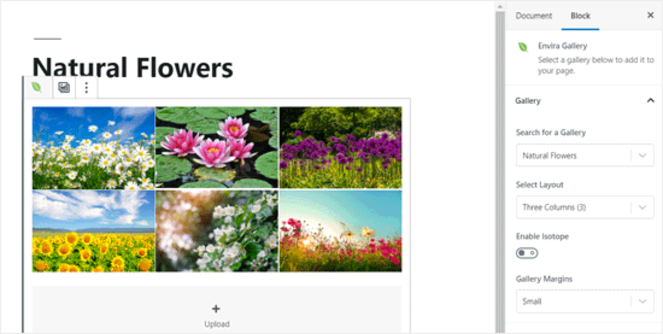
When you open a new post, search for and add the Envira Gallery block, like this:
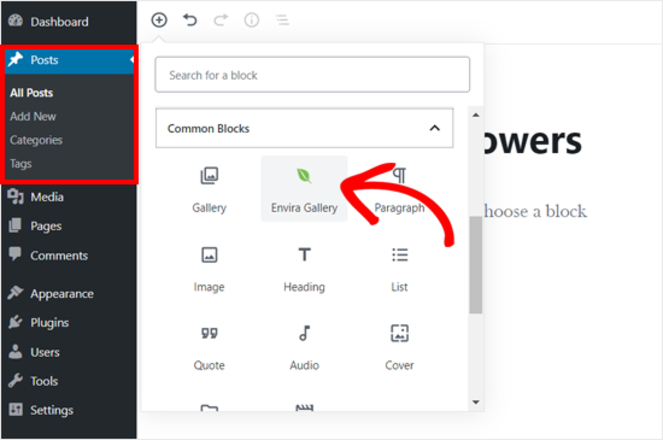
From here you can search a gallery by its name or find it by clicking on the dropdown arrow icon:

The plugin will then load your gallery in the post editor:
You can now save and preview your live post with your image gallery.
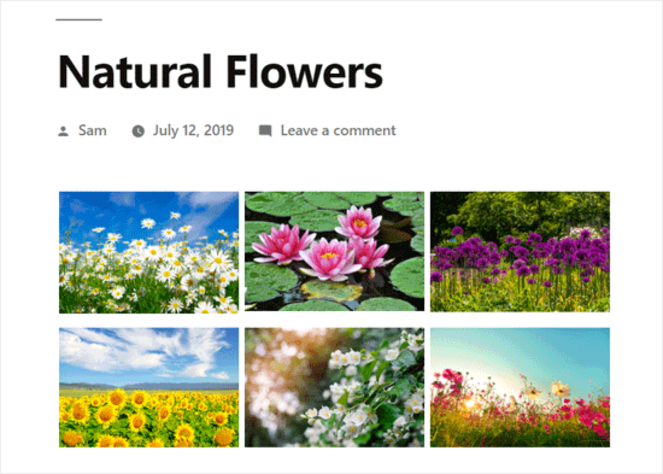
When you click on an image, it’ll open as a lightbox popup. On both mobile and desktop, your images will display beautifully and be easy for visitors to swipe through.
That’s all there is to it!
Method 3: Make An Image Gallery Without WordPress Gallery Plugins
For the final method of creating a photo gallery, you don’t need a plugin.
WordPress’ built-in feature makes it possible to create basic galleries for your blog. While it won’t have advanced gallery options like the previous WordPress plugins, it’s still a worthy option for those looking to create a free gallery.
First, you need to create a new page or post in WordPress where you want to add your image gallery.
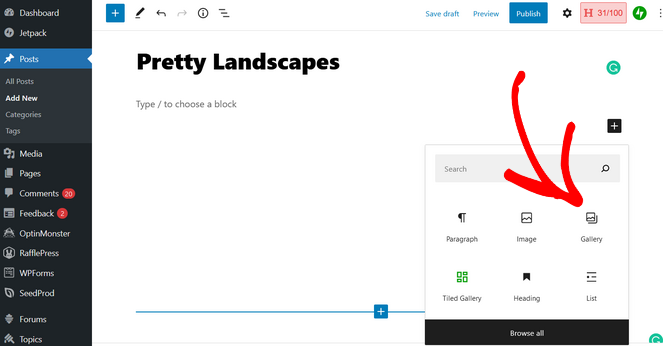
Then, click the Add New Block (+) icon and select the Gallery block:
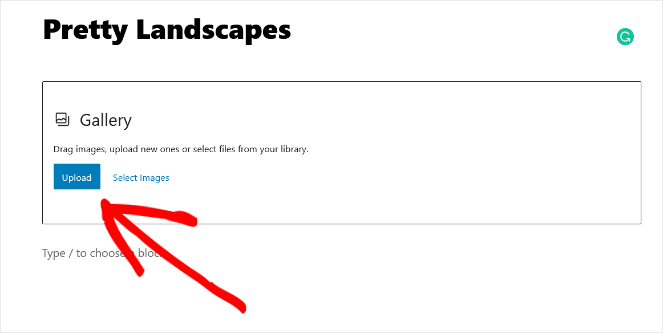
Here, you can upload your photos one by one or select multiple photos from your library at once using the Select Images option.
When choosing files from your media library, you can also enter information like the title, alt text, description, and caption to optimize your images for SEO.
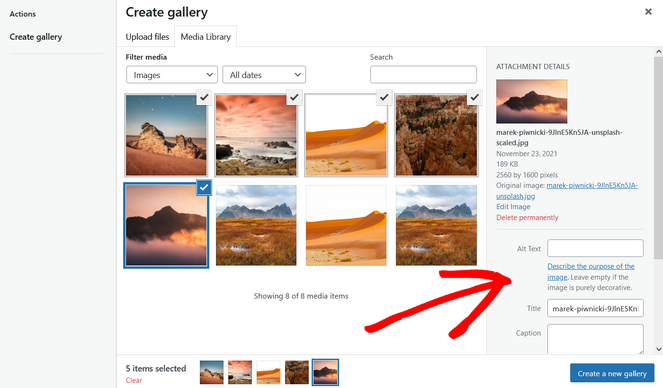
After selecting your images, click Create a new gallery.
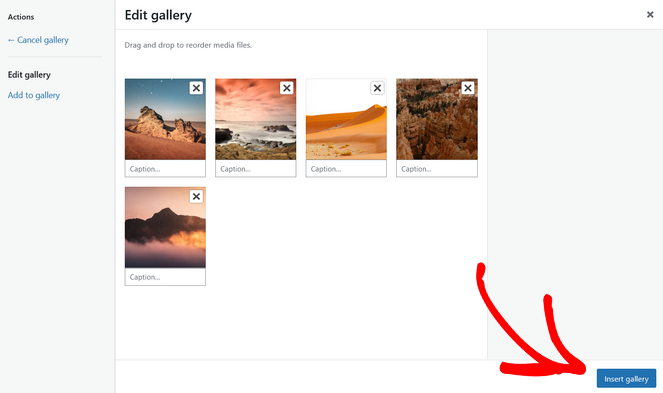
Now, you can rearrange your photos if you want by dragging and dropping them into your desired order. When you’re happy, click Insert Gallery.
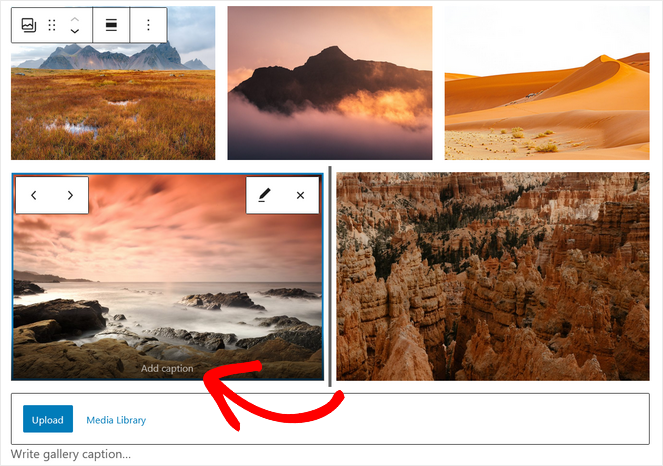
Your gallery should now show up on your post or page. If you didn’t set captions for your photos before, you can do it now by clicking on the gallery or individual images and entering the information where it says “Write caption.”
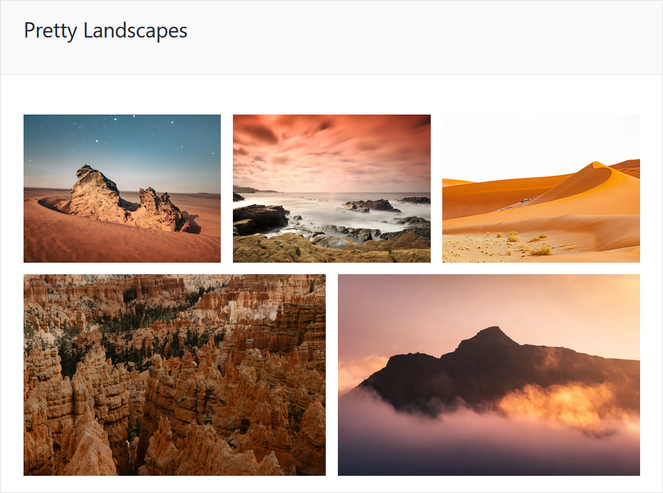
Once you’re ready to publish your gallery, click the Publish button in the WordPress editor.
You’ll then see your image gallery come to life on your website.
While this method is simple, it lacks extended features that some users might want for their galleries. You can’t organize your galleries by categories, albums, tags, etc. like another gallery plugin may offer.
Additionally, this method is the least user-friendly. Because your gallery isn’t saved, you’ll need to design it all over again if you want to embed it somewhere else. And there aren’t any customization options that allow you to fully manage the design and look of your gallery.
For creating more professional galleries on your blog, we recommend using an image gallery plugin for WordPress and getting those extra features to add functionality to your gallery.
Create The Best WordPress Image Gallery For Your Blog Today!
And that’s all there is to it! These are the 3 easy methods you can use to add a photo gallery to your WordPress blog.
We hope you enjoyed this tutorial and found it useful. If you liked it, be sure to also check out our guide on how to find free images for your blog.
And if you’re interested, check out our guide on how to allow WordPress users to upload images on your blog!
And don’t forget to sign up for our email newsletter for more helpful blogging tips sent straight to your inbox!


Nice Post !
Thanks for sharing beautiful blog !
Hey Blog Tyrant,
Aadarsh this side. It is my first time commenting on your blog page and am glad to say that you have shared an excellent content providing great tips for creating photo-gallery in WordPress site. I really like and appreciate the way you have explained and presented things in such a step-by-step process guide that are so true to understand. Your each listed steps (including images ) are so clear and easy to follow. Considering your steps will be a great helping hand and allow users to create an image gallery in wordpress-site.
After reading this guide i gain ideas and am sure that this post will surely help lots of people, readers and especially wordpress-user. Lastly i would like to say that you are definitely providing good understanding to your readers.
Very useful and keep sharing more similar post.
Thanks,
-Aadarsh
nice