
W ant to create your own social media 'link in bio' landing page with WordPress?
Many famous bloggers and influencers use link in bio pages to send traffic from social media to their websites. And you can use the same strategy to boost traffic to your new blog. But you may be surprised to learn that you can create your own special page in WordPress!
And in this step-by-step guide, I’ll show you exactly how… Feel free to skip ahead!
In This Guide:
Or if you’re particularly curious, you can first learn more about link in bio pages 😉
What is a Link in Bio Page? (And Why You Need It)
A link in bio page is a page that you can link to from your social media profiles. It includes multiple links on a single page that social media users can click on and visit.
Social media platforms like Instagram, Facebook, and Twitter only allow you to place a single link in your bio. That means you can only send traffic to one web page.
But with a link in bio page, you can drive valuable traffic from social media to multiple different web pages, blog posts, social media posts, and so on.
For example, fashion blogger Kellie Brown uses a link in bio page on her Instagram profile:
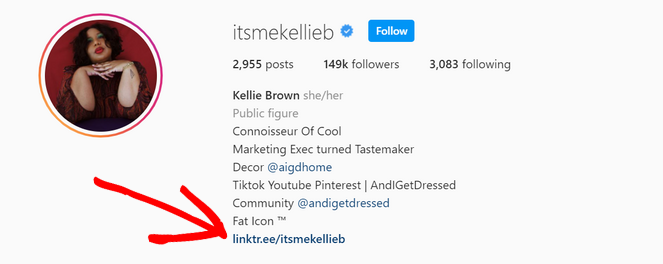
This link in bio page includes links to her:
- Blog posts
- Guest posts
- Email newsletter signup page
- YouTube channel
- Pinterest profile
- And more
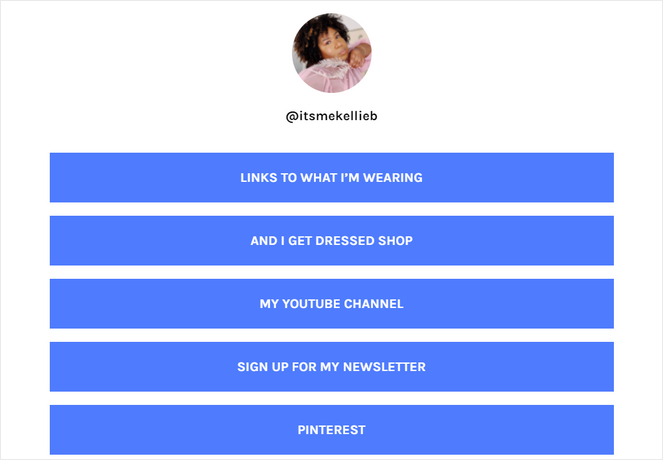
A link in bio page is the perfect way to promote all of your most important content and channels to your social media followers.
You can use it to grow your email subscribers, drive traffic to popular blog posts, get more YouTube subscribers, sell more subscriptions to your online courses, and much more.
Without a link in bio page, you can only promote one thing at a time in your Instagram bio.
Now that you know why you need a link in bio page, let’s look at how to create one in WordPress…
How to Create a Link in Bio Landing Page in WordPress
There are some well-known link in bio tools like Linktree, ContactInBio, and Bio.FM that you can use to create a link in bio page.
But, these tools don’t integrate well with WordPress, and they’re not super customizable either.
Luckily, you can use a WordPress plugin to create a link in bio page instead. With this method, you can easily manage your link in bio page right from your WordPress dashboard.
Plus, you can create a custom design for your link in bio page that matches the rest of your website and branding.
You’ll also be able to monitor the traffic to your link in bio page and discover insights like the time users spend on the page if you’re using a plugin like MonsterInsights.
So, how do you make a custom link in bio page in WordPress?
We recommend using SeedProd, the best drag and drop website builder for WordPress.
SeedProd makes it easy to create custom pages and layouts for your WordPress site without writing any code.
It comes with 300+ professionally designed templates to get you started quickly. Using the visual builder, you can drag text, images, and other elements and drop them into place to create unique pages for your blog.
You can create any type of page you want, including a link in bio page, in minutes.
This makes SeedProd the best Linktree alternative for WordPress bloggers.
You can learn more about this awesome plugin in our detailed SeedProd review.
Now, let’s dive into the tutorial…
(If you’d like a video walkthrough as well the team at SeedProd produced a great video to go along with this written guide)
1. Download and Install the SeedProd Plugin
To get started, you need to download the SeedProd plugin.
First, go to SeedProd’s official website and click on the Get SeedProd Now button.
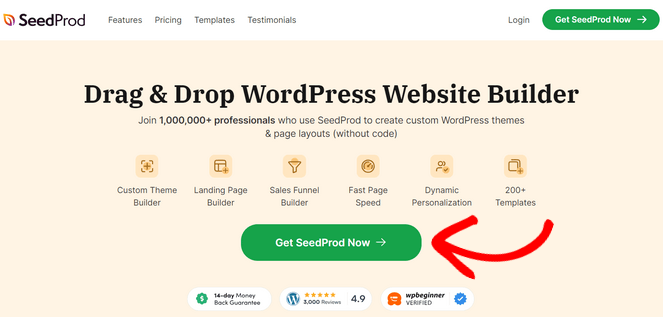
After that, choose a pricing plan and follow the checkout process to purchase the plugin.
There is a free version of SeedProd, but for this tutorial, we’ll be using the premium version which comes with advanced features and additional templates.
Next, you need to install and activate the SeedProd plugin on your WordPress site.
If you haven’t installed a plugin before, check out our guide on how to install a WordPress plugin for step-by-step instructions.
Once the plugin is installed and activated, go to SeedProd » Settings to enter your SeedProd license key. You can find your license key in your account area on the SeedProd website.
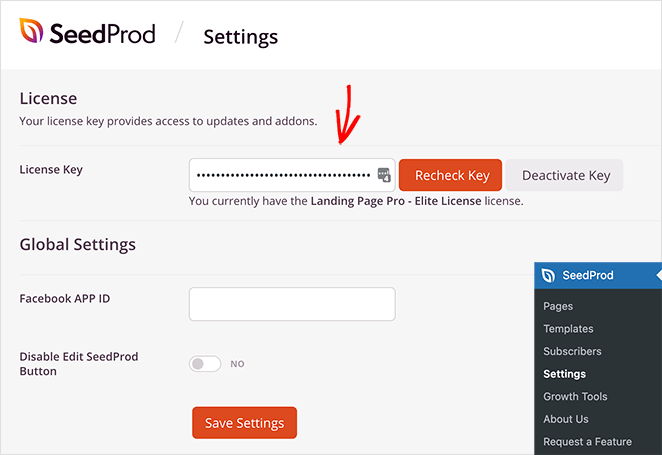
After your license key is activated, you’re ready to create a WordPress link in bio page.
2. Add a New Landing Page
From your WordPress dashboard, go to SeedProd » Landing Pages. This will take you to a page where you can create several different types of pages.
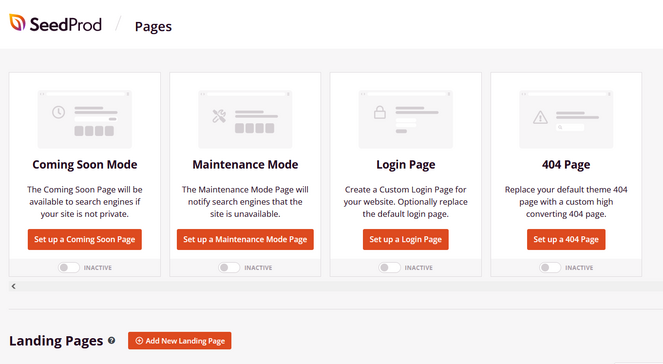
You can choose from options like:
- Landing page
- Coming soon page
- Maintenance mode page
- Login page
- 404 page
To create a link in bio landing page, click on the Add New Landing Page button.
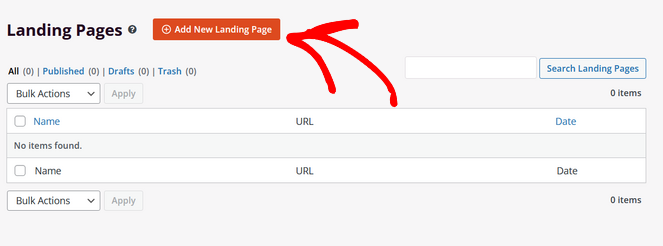
Underneath that button is the section where you’ll be able to see all of the landing pages you’ve created. You can create as many as you want with SeedProd.
After clicking Add New Landing Page, you’ll be prompted to choose a landing page template.
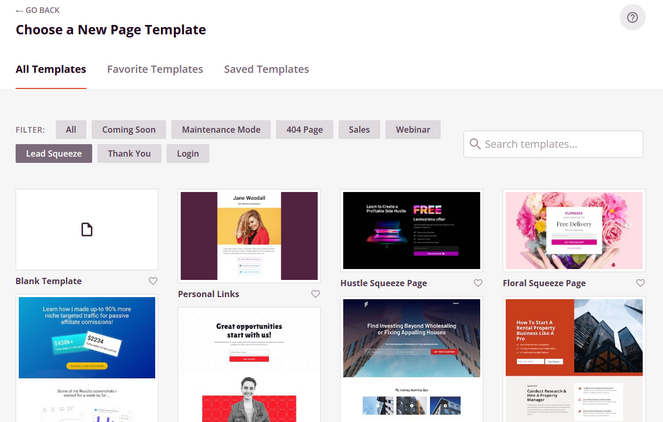
You can choose any template you want as a starting point for your link in bio page. Or, you can use the Blank template to start from scratch.
But, for this tutorial, we’ll choose the Personal Links template, which is under the Lead Squeeze tab.
To select the template, simply hover over it and click on the orange checkmark button.
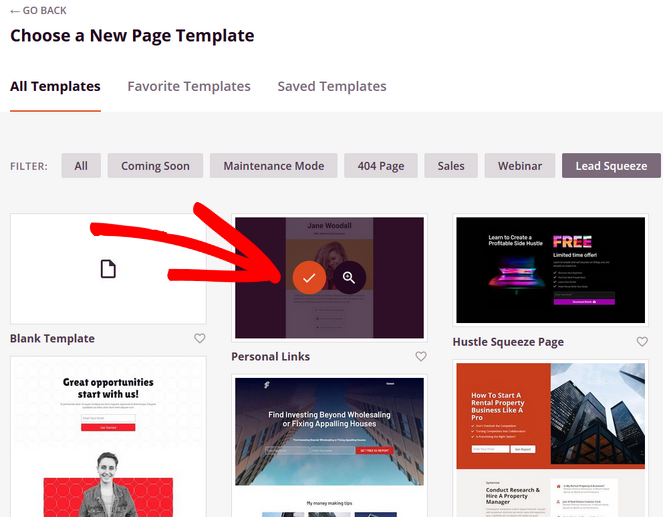
After selecting the template, a window will pop up where you can name your new landing page.
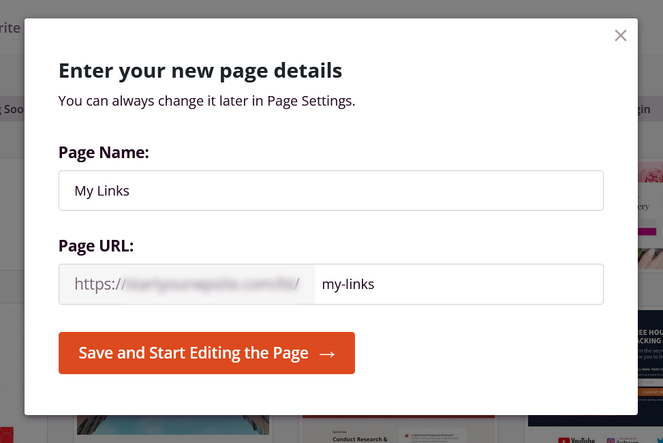
The name won’t appear on the page, but it will become the URL for your page. So, choose a name that will help people understand the link when it’s added to your Instagram bio.
Click the Save and Start Editing the Page button to move on to the next step…
3. Customize Your Landing Page
Now you can start customizing your landing page template in SeedProd’s visual builder.
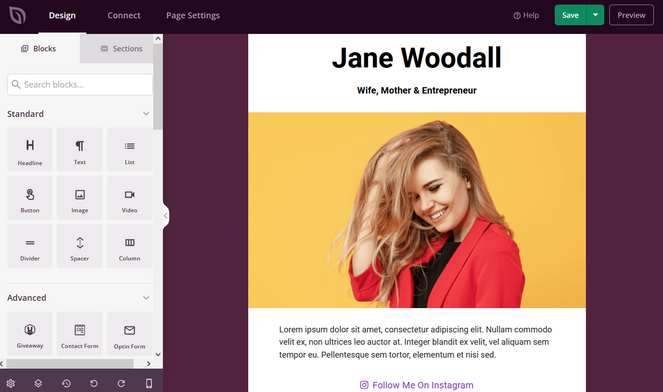
On the left side of the screen, you can see a variety of ready-made blocks that you can add by dragging and dropping. You can see a live preview of how your page looks on the right side.
You can edit any existing part of the template by pointing and clicking on it.
For example, you can change the headline by clicking on it. Then, a panel will appear on the left side of the screen where you can replace the text with your own.
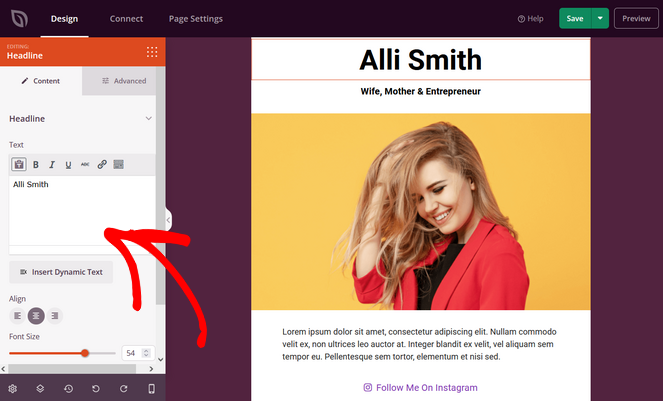
You can also change the font size, alignment, and more.
Next, you’ll want to replace the template image with your own. To do that, hover over the image and click on the trash can icon. Then, click the Yes, Delete It option that shows up afterward.
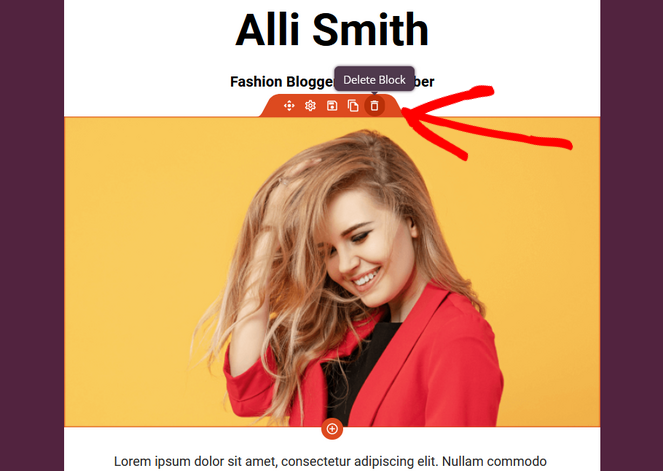
Then, in the left-hand panel, find the Image block and drag it over to the right side of the builder. Simply drop it in the place where you want it to appear.

After adding the block, you can see the settings on the left side of the builder. Here you can click on the Use Your Own Image to upload a photo from your media library or computer.
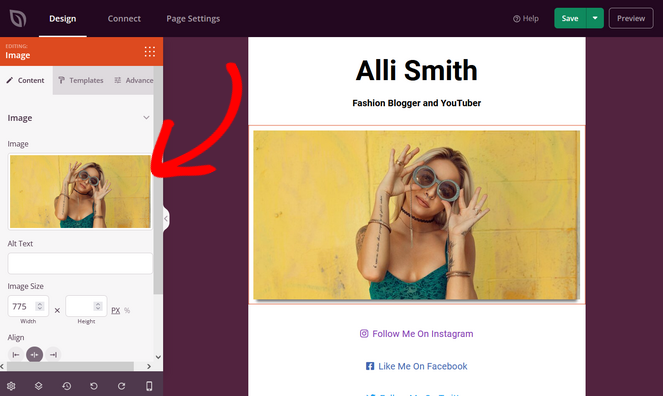
You can also add alt text, change the image alignment, choose a template style, and more.
If you want to change the background of your page, click on the Global Settings icon in the bottom-left corner of the screen.
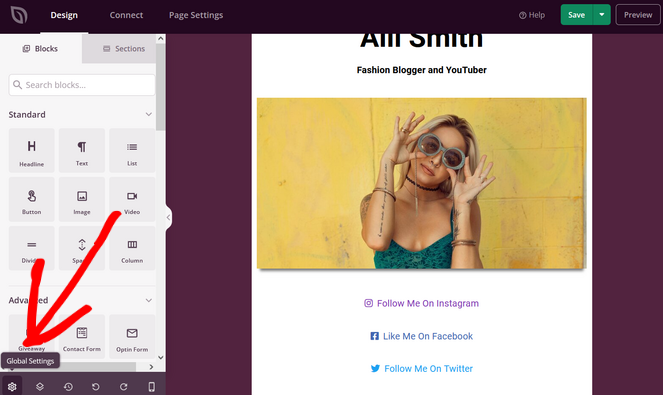
Now click the Background tab to open up the different background options for your page. You can choose a solid background, a gradient background, or even upload a background image, video, or slideshow.
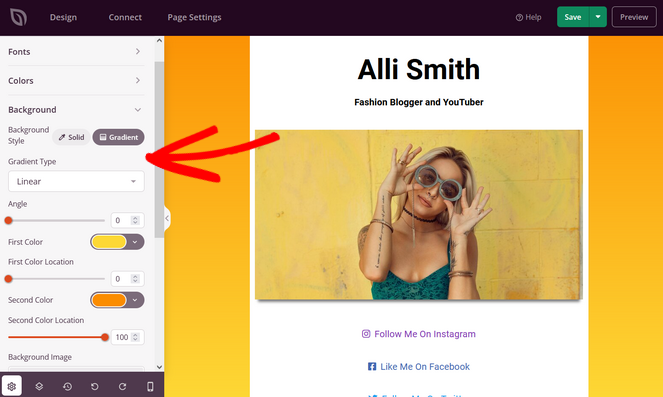
Don’t forget to hit the Save button to save your changes.
4. Add Your Links
Once you’ve got your link in bio page looking great, it’s time to add your links to it.
You can get started by editing the existing links on the template. Click on any link to edit it.
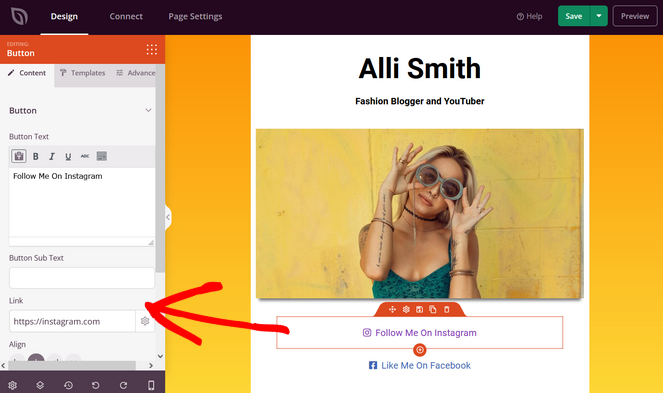
In the Content panel on the left, you can change the button text and add your own link. You can also change the button sub text, alignment, size, and icon.
You can also change the entire button style in the Templates tab. Simply click on one of the ready-made styles to apply it to your button link.
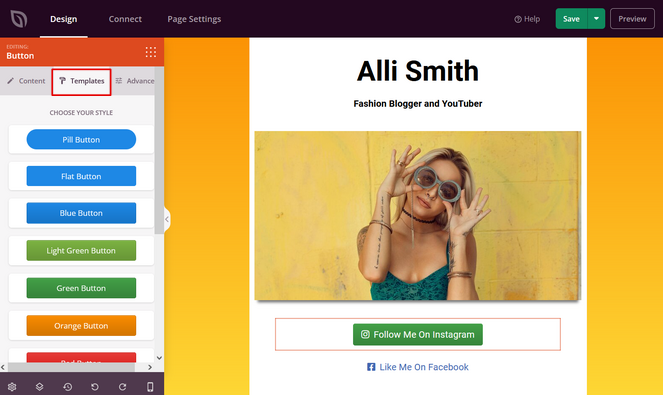
If none of the styles match your brand or WordPress theme, you can go to the Advanced tab. From there, you can choose a custom color, button style, typography, and more.
To add additional button links to your page, hover over an existing link and click the Duplicate Block button.
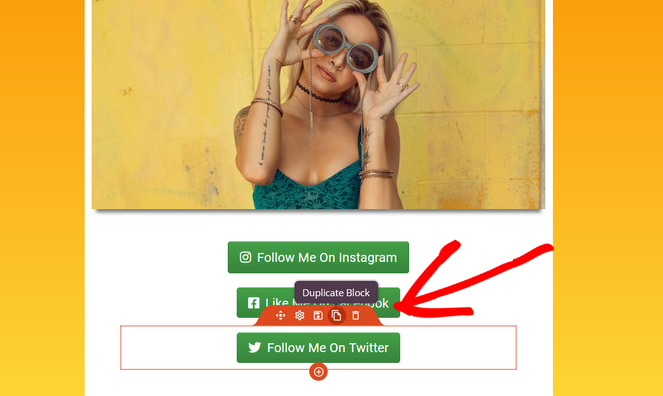
This will add a copy of that block underneath the original block. Now, you can edit the content of the new block like you did before.
For example, let’s turn that duplicate block into a ‘Read My Blog’ button link. Click on the block to edit it and in the Content panel, replace the text and add a link to your blog page.
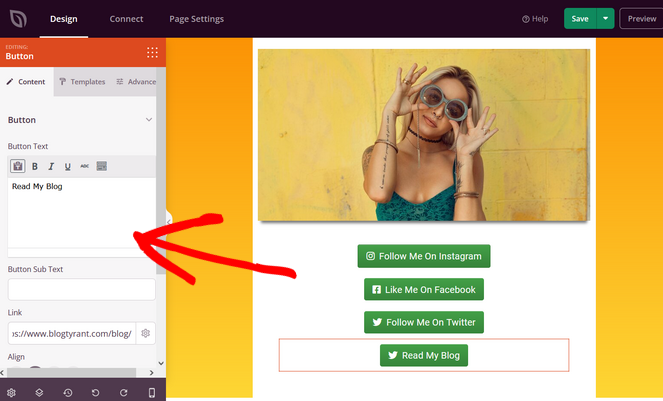
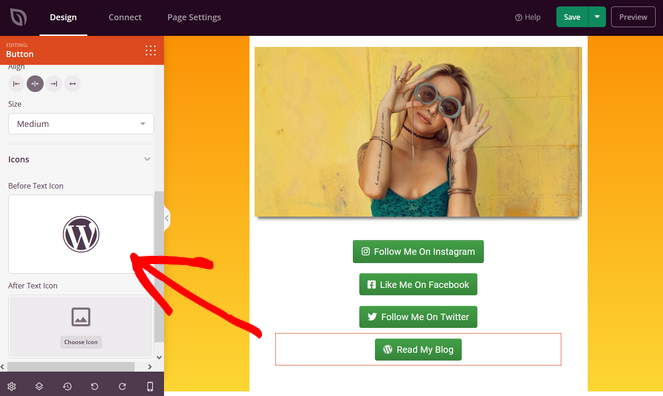
You can also add different icons to your button links by scrolling down to the Icons section of the content settings panel. Click on the icon image and choose a new one from the built-in icon library.
Once you’re happy with how your page looks and you’ve added all the links you want, click on the Save button in the top-right corner.
5. Publish Your Link in Bio Page
Before you publish your link in bio landing page, it’s important to make sure that it looks excellent for users that are browsing from their mobile devices.
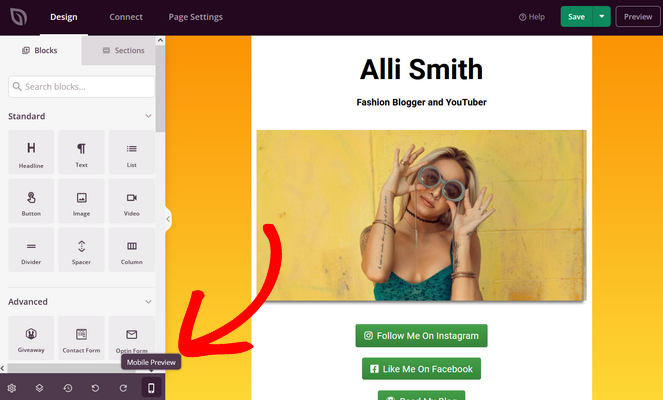
To do this, click on the Mobile Preview icon at the bottom of the screen.
Now you can see how your page looks on mobile devices:
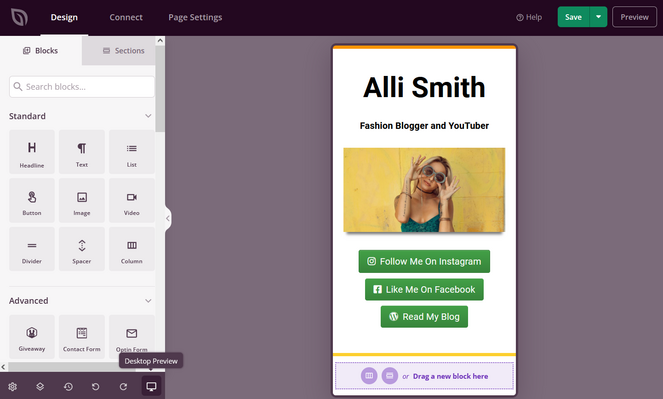
If you need to make any changes, you can click on any block to edit it, just like you did with the desktop version.
Lastly, it’s time to publish your link in bio page!
To do that, click on the dropdown arrow next to the Save button in the top-right corner of the screen. Then, click the Publish button.
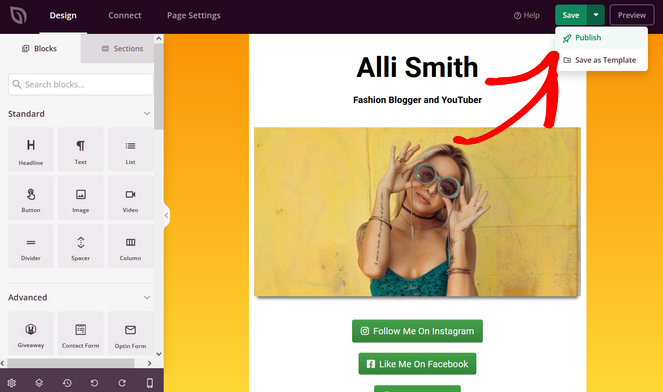
You’ll then see a success message, and you can click on the See Live Page button to view your published link in bio page.

Now that your page is live, you can add the link to your Instagram bio or anywhere else you want.
That’s a wrap!
You learned how to create a custom link in bio landing page in WordPress. This will help you drive traffic from social media to your blog or any other content you want to promote.
If you enjoyed this tutorial, you might want to check out our guide on how to add an Instagram widget in WordPress. This can help you introduce your Instagram content to your blog readers, boost engagement, and get more Instagram followers.
And don’t forget to sign up for our email newsletter for more helpful blogging tips!


0 Comments
Join in. The comments are closed after 30 days.