
W ondering how to add custom code in WordPress?
If you’re looking to customize your WordPress blog, you’ve probably come across many WordPress tutorials that tell you to add custom code snippets in your theme’s functions.php file.
However, this is pretty complicated for beginners, and making even the smallest error can break your website.
Luckily, there is an easier way to add custom code snippets!
In this article, I’ll show you how to add custom code in WordPress using the best code snippets plugin for beginners – WPCode.
In This Guide:
Key Takeaways on How To Add Custom Code To WordPress
- Install and activate the free WPCode plugin to easily add custom code snippets to your WordPress site.
- Add a new code snippet by providing a title, pasting the code, and selecting the code type.
- Choose either to automatically insert the code snippet or use a shortcode to place it anywhere.
- Use Smart Conditional Logic to show/hide code snippets based on specific rules like URLs or user roles.
- Add tags and notes to code snippets for better organization.
- Set priority levels to control the order in which multiple snippets execute.
- Easily add code to the WordPress header, body, or footer areas.
- WPCode’s smart validation prevents code errors that could break your site.
- Manage all snippets from a central screen – activate, deactivate, filter, and export/import.
Why You Need a Custom Code WordPress Plugin
As I mentioned in the intro, many WordPress tutorials will instruct you to add custom code snippets to your theme’s functions.php file.
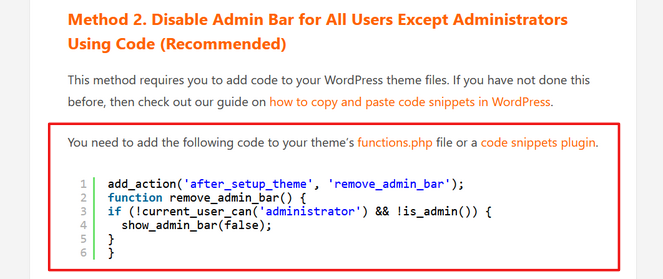
But, editing your theme’s functions.php file can be risky because the smallest mistake can make your website inaccessible.
There are other issues with adding code to the functions.php file as well.
For example, if you add code to your functions.php file but change your WordPress theme, all of your customizations will be lost.
And after adding multiple code snippets, it can also become difficult to manage the file.
So, unless you’re an experienced developer, you may want to avoid messing with your site’s PHP code.
That’s where WPCode comes in.

WPCode – with over 2 million active installations – is the best plugin to add custom code to WordPress sites.
This is because it helps you do it without needing to edit your theme’s functions.php file.
And WPCode offers full support for custom PHP, HTML, JS, CSS, and more.
It even comes with a ready-made snippet library with 1100+ expert-approved snippets to help you quickly add custom functionalities to your WordPress site. This eliminates the need to install individual plugins for each feature request.
Choose from popular WordPress code snippets like disable comments, disable Gutenberg, allow SVG file uploads, disable REST API, and more.
WPCode also makes it easy to add tracking codes for Google Analytics, Facebook Pixel, Google Adsense, and more to your website’s header and footer areas.
With WPCode, you never have to worry about breaking your site messing with the backend of a plugin or theme file.
The smart code snippet validation feature helps you prevent common code errors.
Plus, you can visually manage all of your custom code snippets from one central screen.
- Easy to set up and use
- Insert any code or script, including PHP, HTML, CSS, JavaScript, and more
- Built-in code snippets library
- Smart code validation to prevent errors
- Import and export code snippets
WPCode Lite is free and has everything you need to add custom code in WordPress.
If you want more powerful features like a private cloud snippet library, code revisions, and deeper integrations with popular plugins, you can upgrade to the premium version of WPCode.
With that, let’s begin the tutorial on how to add custom code in WordPress…
How To Custom Code To Your WordPress Site with WPCode
To get started, you first need to install and activate the free WPCode plugin to add it to your WordPress site.
If you need help, check out our tutorial on how to install a WordPress plugin.
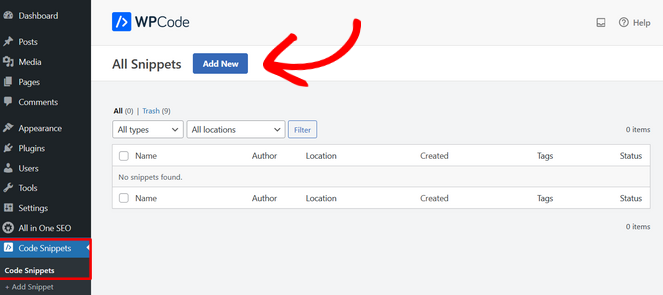
Once the plugin file is activated, you’ll see that a new menu item called Code Snippets has been added to your WordPress admin bar. By clicking on it, you’ll be taken to a page where you can see all of the custom code snippets you have added to your site.
Since you just installed the plugin, you won’t see any code snippets saved here.
To add your first custom code snippet in WordPress, go ahead and click the Add New button.
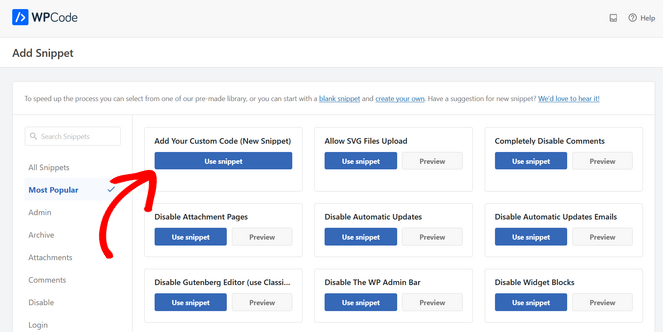
On the next page, you have the option of choosing a code snippet from the built-in Snippets Library or you can add your own custom code.
To easily add code snippets, click on the Use Snippet button underneath the Add Your Custom Code (New Snippet) option.
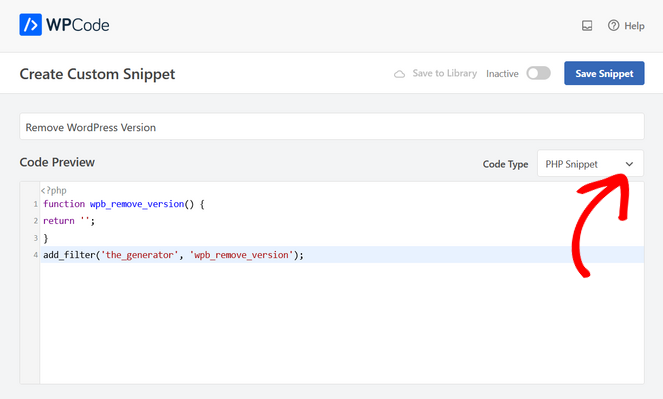
This will bring you to a new page where you can enter a title for your custom code snippet. You can enter any type of title that helps you recognize the code later.
Next, copy and paste your code snippet into the Code Preview box. Don’t forget to select the correct code type from the drop-down menu on the right side of the screen.
After that, scroll down the page to the Insertion section.
Here, you can choose from two ways to insert your code in WordPress: Auto Insert and Shortcode.
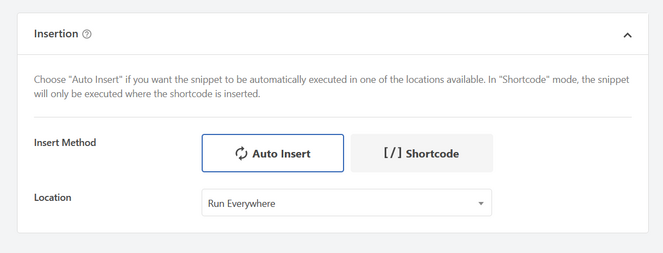
With the ‘Auto Insert’ option, your custom code snippet will be automatically inserted and executed on your site in your chosen location (WordPress function).
You can automatically run the snippet in the WordPress admin area only, frontend only, before or after a post, and more. If you’re unsure, you can select the default ‘Run Everywhere’ option.
Alternatively, you can pick the ‘Shortcode’ option to manually copy and paste the code snippet anywhere on your site.
Next, when you scroll further down the page, you’ll see a Smart Conditional Logic section.
If you choose the Auto-Insert option, you can use this powerful feature to either show or hide snippets based on a particular set of rules.
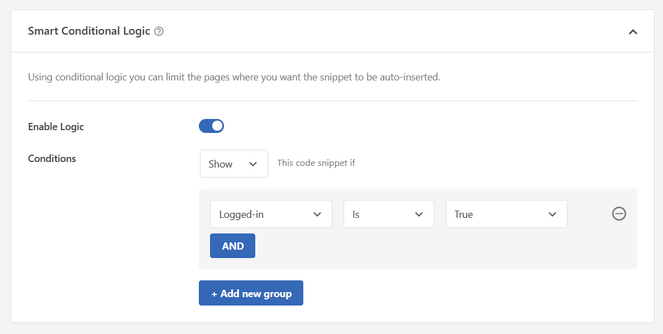
For example, you can load code snippets only on specific page URLs, for logged-in users, for users with the ‘Contributor’ role, and more.
At the bottom of the page, there’s a Basic info section. Here, you can assign tags to your code snippet and notes to stay organized.
- The notes can help remind you what the code snippet does and where you found it,
- And the tags will help you sort your snippets by topic and functionality.
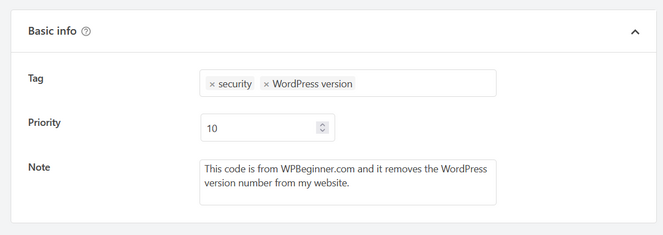
There’s also a priority field that allows you to control the order in which snippets are executed when you want to run multiple snippets in the same location.
By default, all snippets get a priority of 10. If you want a particular snippet to be executed before the others, simply assign it a lower priority number, like 7.
Once you’re finished configuring the options, go back to the top of the page and toggle the switch from ‘Inactive’ to ‘Active.’
Then, click the Save Snippet button.
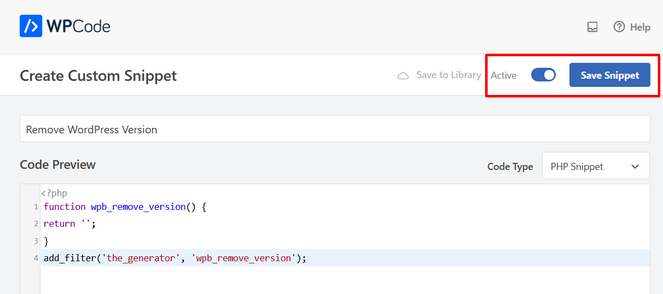
If you want to save the code snippet but not activate it, click the Save Snippet button only.
Once the snippet is active, it will be executed automatically or displayed as a shortcode, depending on your chosen insertion method.
That’s it! You’ve successfully added custom code in WordPress with WPCode.
Adding Code to the WordPress Header and Footer
Some WordPress tutorials will only instruct you to add code to your theme file’s header.php or footer.php files.
Typically, this is for tracking scripts, JavaScript code, and custom CSS.
WPCode makes this easy, too!
Simply go to Code Snippets » Header & Footer from your WordPress admin dashboard.
Next, copy and paste your code snippet into the header, body, or footer area.
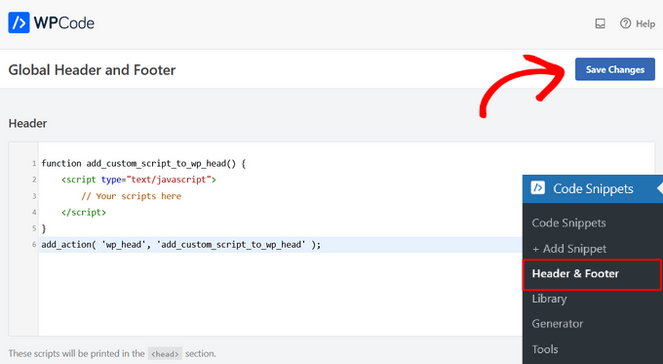
Then, you can hit the Save Changes button, and your code snippets will be live on your WordPress website.
Preventing Custom Code Errors in WordPress
With WPCode, you never have to worry about making code errors that will break your site and make it inaccessible.
WPCode will automatically detect if there’s a syntax error in your custom code, display an error message, and deactivate the snippet immediately.
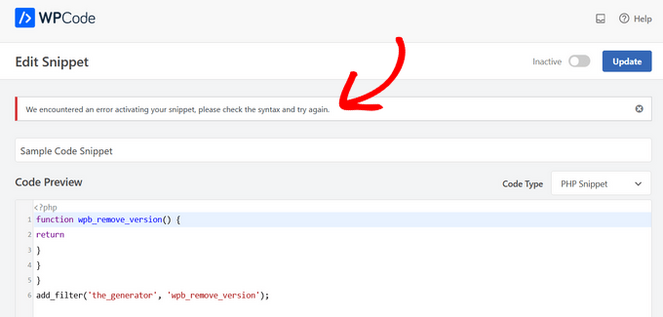
As you’re adding code in WordPress, WPCode’s smart code snippet validation will also detect any errors.
You can hover over the error message to see what the issue is and how to fix it.
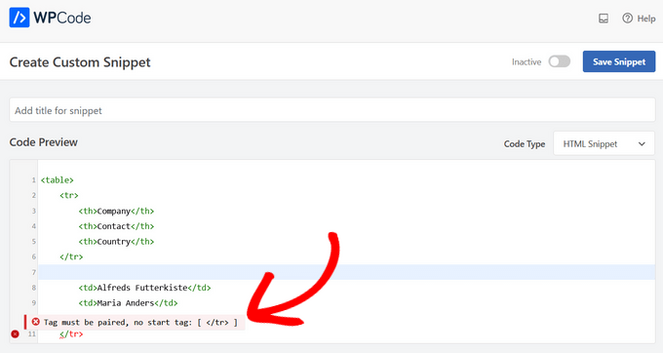
Even if your syntax is correct but the snippet throws an error when it’s executed later, WPCode’s error protection system will deactivate the snippet immediately so that you won’t get locked out of your site.
Managing Your Custom Code Snippets
One of the best parts about WPCode is that it provides you with a user-friendly interface that makes it easy to manage all of your custom code snippets in WordPress.
On the All Snippets page, you can see a list of all of the custom code snippets you have saved on your site.
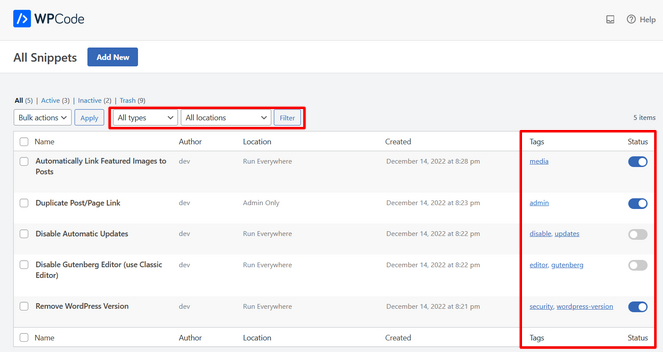
From this page, you can activate or deactivate snippets anytime you want with 1-click, filter the snippets by type and location, and use tags to organize the snippets easily.
If you’re migrating your website to a new host or server, you can also easily export your snippets, either in bulk or specific snippets only.
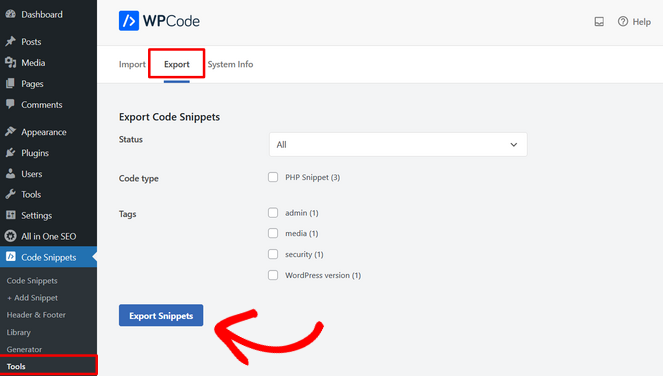
To do this, go to Code Snippets » Tools and click on the Export tab. Then, simply choose the snippets you want to export and click the Export Snippets button.
To import the snippets on your new site, simply go to Code Snippets » Tools » Import and upload the export file.
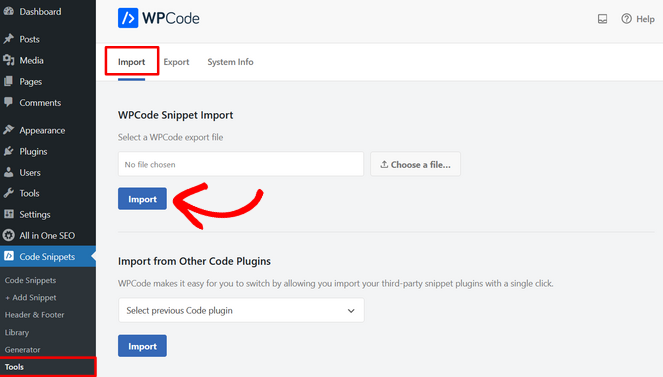
Then, click the Import button.
Still need some help? Here’s a great video walkthrough by WPBeginner!
Add Custom Code Snippets To WordPress In Closing
That’s a wrap! I hope this article helped you learn how to add custom code in WordPress in the safest possible way.
There are really a ton of different ways to use WPCode and it’s one of the best WordPress advertising management plugins.
If you enjoyed this article, you may want to check out our post on how to create a custom WordPress theme for your blog, no coding required.
While you’re here, make sure you also subscribe to our newsletter to get blogging tips delivered straight to your inbox!



0 Comments
Join in. The comments are closed after 30 days.