W ondering how to add recipe schema in WordPress?
If you have a food blog, you’ll want to add recipe schema to your website. This will allow you to display your recipes as mouthwatering, rich results in Google search results.
This will make your recipes stand out from the competition and help you get more clicks and traffic to your blog.
In this article, I’ll show you step-by-step instructions on how to add recipe schema in WordPress.
In This Guide:
But first, I’ll share the key steps and then dive deeper into recipe schema and how it can benefit your food blog.
Key Takeaways on How To Generate Recipe Schema for SEO
- Install and activate the AIOSEO plugin on your WordPress site.
- Navigate to the plugins Schema Markup settings and configure your desired content types for recipe schema.
- When creating or editing a post or page, use AIOSEO’s dedicated Recipe Schema section to input recipe details like name, description, ingredients, instructions, cook time, and more.
- Publish your content, and AIOSEO will automatically generate the structured data for search engines to display rich recipe snippets in SERPs.
What is Recipe Schema Markup, and Why Do You Need It For Rich Results?
Simply put, recipe schema markup, or structured data, is a special code you add to your website and helps search engines like Google understand what your page is about.
As a result, you can enhance your content in Google search results and Google images, getting it displayed as a featured snippet.
Featured snippets are highlighted search results with additional information displayed at the top of search results pages.
I.e your delicious-looking recipe snippets can show images, ingredients, cooking and preparation time, star ratings, nutritional value, and more that you want your recipe snippet to include.
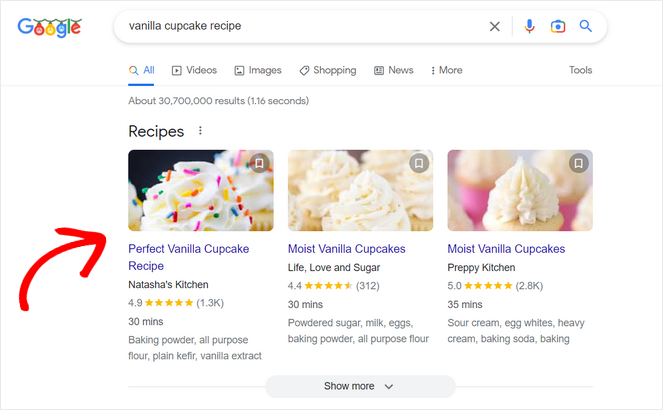
These recipe snippets (sometimes called a recipe card) are more noticeable in the search results (SERP) and provide information users are looking for, so they’re likely to get more clicks.
This can help you:
- Boost your click-through rate (CTR) and improve blog SEO
- Drive more traffic to your blog
- Attract loyal readers and get more conversions
Plus, using schema markup enables Google Assistant to guide users step-by-step through your recipes on Google Home devices and smart displays.
Now that you know the benefits of recipe schema, let’s start with the tutorial on adding recipe-structured data in WordPress.
How To Add SEO-Friendly Recipe Structured Data in WordPress (Step-by-Step)
The easiest way to add recipe schema in WordPress is by using the All in One SEO (AIOSEO) plugin.
- Easy setup wizard
- On-page SEO optimization
- Tru-SEO score with actionable insights
- Unlimited SEO keywords
- Snippet preview to see how your post will look in search results
- Powerful XML Sitemaps
- Local Business SEO
It’s one of the best SEO tools on the market, used by over 3,000,000 website owners.
With AIOSEO’s next-gen Schema Generator, you can easily add schema markup to your WordPress post or page in minutes and perform rich results tests all without touching a line of code.
Aside from the Smart Schema Markup, AIOSEO comes with a ton of powerful features to help you improve WordPress SEO including TruSEO on-page analysis, SEO audit checklist, smart XML sitemaps, internal linking assistant, WooCommerce SEO, and much more.
There is a free version of AIOSEO. But, you’ll need the All in One SEO – WordPress SEO Plugin and Toolkit AIOSEO Pro version to access the Schema Generator feature, which allows you to add any type of schema markup to your website.
Now – just want to include a quick note that you can add structured data manually by adding JSON-LD structured data snippet to a page’s HTML.
But even Google admits that sometimes editing HTML in a content management system (CMS) like WordPress can be tough and maybe even impossible. So, I highly recommend doing it with a plugin.
Step 1: Install and Activate the AIOSEO Plugin
To get started, you need to install and activate the AIOSEO plugin to make sure it’s enabled on your website. If you need instructions, see our guide on how to install a WordPress plugin.
You can also follow along with this AIOSEO guide for setting up the plugin and recipe structured data.
Once the plugin is installed and activated, go to All in One SEO » General Settings from the dashboard in your WordPress admin panel.
Here, you can activate your license key, which you can find in your AIOSEO account, if you’re using the Pro version of AIOSEO.
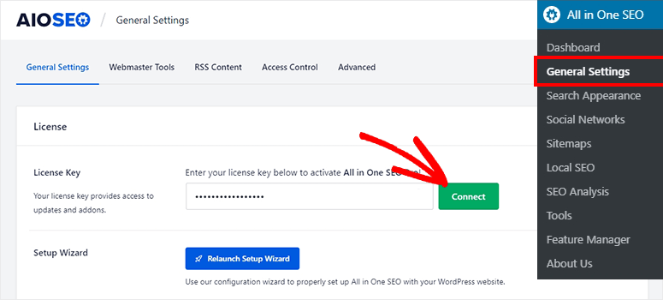
After copying and pasting the license key into the field provided, click the Connect button.
Step 2: Configure Schema Type and Settings For Your Recipe Schema Generator
Next, go to All in One SEO » Search Appearance from your WordPress admin area and click on the Content Types tab. Then, click on the Schema Markup tab.
Here, you can configure the Schema Markup settings for your posts, pages, products, groups, and all other types of content on your website.
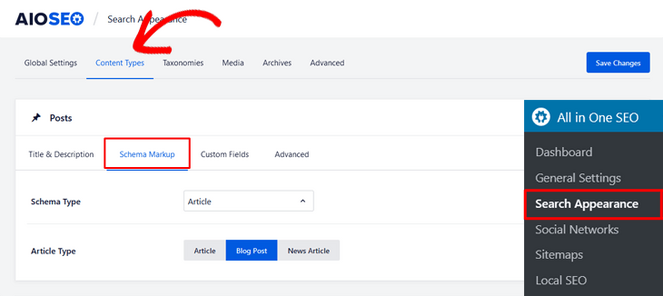
Simply click on the Schema Type dropdown menu and choose the Recipe option.
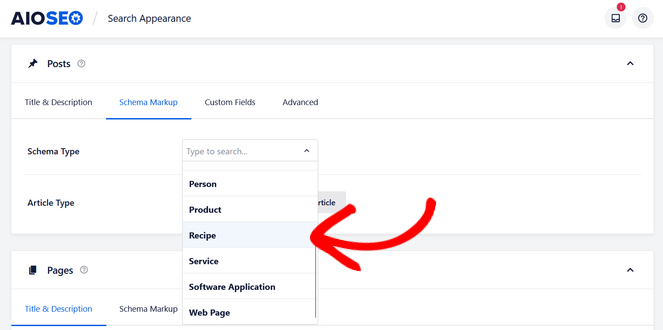
You can scroll down and repeat the same process for pages, products, custom post types, memberships, and all other content types.
Don’t forget to click the Save Changes button when you’re finished.
Step 3: Add Recipe Schema Markup to Your WordPress Posts and Pages
Next, you need to add recipe information to the individual posts and pages you want to display in the featured snippets.
To do that, go ahead and edit an existing WordPress post URL or create a new one. In the WordPress editor, scroll down to the ‘AIOSEO Settings’ meta box and select the Schema tab.
Here, you can see that the default schema in use is ‘Recipe.’ That’s because you chose it as the schema type for your posts in the previous step.
Now, click the Edit Schema button, which looks like a pencil icon, to add your recipe information.

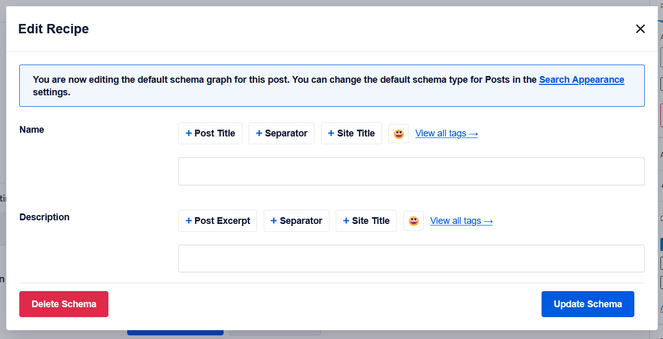
This will open up a modal where you can enter details about your recipe and tell Google more about it.
Start by adding the name of the dish, a description, and the author that you want to display in search results.
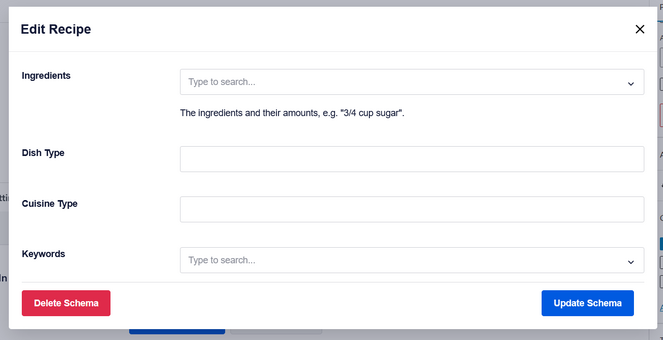
When you scroll further down, you can add more information like the ingredients and their amounts, the dish type, cuisine type, and additional relevant keywords for your recipe like the season, specific holiday, or theme.
Note: Do not enter the name of your recipe or cuisine type in the ‘Keywords’ field.
You can also add:
- An image of your recipe or dish,
- Nutrition information like the serving size and calories,
- Number of servings,
- The estimated length of time it takes to prepare and cook (total time required),
- The average star rating and number of ratings your recipe has received,
- And step-by-step cooking instructions.
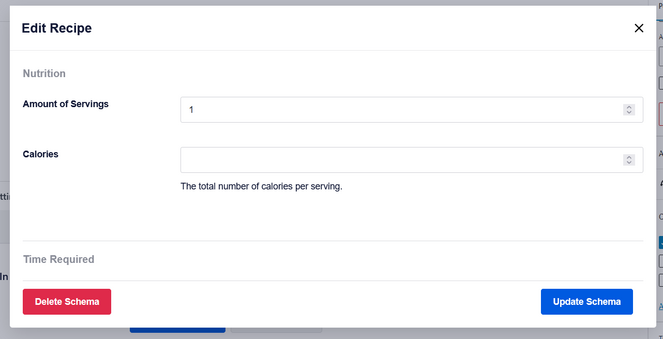
Once you’re finished filling out the recipe information, click the Update Schema button.
Then, simply publish or update your blog post from the WordPress editor.
That’s it! AIOSEO will add the recipe schema to your post using your provided data.
You can repeat the same steps to add recipe schema markup to your site’s other posts, pages, or content types.
Note: The information you’ve added for the recipe snippets will not be visible to visitors on your website. It only appears in the schema rich snippets markup source code.
Adding Recipe Scheme Markup for Rich Snippets in Closing
Congratulations! You’ve learned how to add recipe schema in WordPress, and it was pretty easy with All in One SEO (AIOSEO). Now, your delicious recipes have a better chance of appearing as rich snippets in the top of search engine results.
If you enjoyed this post, you might want to check out our picks of the best WordPress themes for food blogs.
Also, don’t forget to subscribe to our newsletter to get blogging tips delivered straight to your inbox!


0 Comments
Join in. The comments are closed after 30 days.