
W ant to learn how to add an Instagram widget in WordPress?
Displaying your Instagram feed on your blog is a great way to increase engagement with your readers, provide them with extra content, and more. Luckily, it’s actually quite easy to embed Instagram on a WordPress website.
In this article, I’ll show you how to easily display Instagram feeds on your blog in 2 different ways: manually and using an Instagram feed WordPress plugin.
So, let’s not waste any time.
In This Guide:
What is a WordPress Widget?
First, if you’re new to WordPress, before you learn how to embed Instagram content on your site, you might be wondering what a WordPress widget is.
Widgets are basically small blocks of content that you can add to the sidebar, footer, and other areas of your WordPress site.
There are WordPress widgets available for many different functions like displaying your most popular blog posts, adding forms, showing social media feeds, and much more.
In the example below, Studio Mommy added an Instagram widget in the footer of its website, along with social media icons, a newsletter signup form, and more.

Adding an Instagram widget to WordPress can be especially beneficial to your blog.
Keep reading to find out why.
Benefits of Adding an Instagram Widget to Your WordPress Blog
There are many ways that adding an Instagram widget to WordPress can help you improve your website and grow your blog.
So, let’s take a closer look at why you should add an Instagram feed to your blog.
Provide Visitors with More Content
When you add an Instagram feed widget to your blog, you’re providing your website visitors with more interesting content to check out. Instead of leaving your blog after reading your latest post, they can scroll through your Instagram feed without having to leave your website.
Adding an Instagram feed to your WordPress site provides extra content that encourages visitors to stay for longer.
Boost SEO
When you add an Instagram widget to WordPress to display your social feed, your Instagram captions are embedded on your site.
This helps search engines better understand what your blog is about, which can help you boost your SEO (search engine optimization) and drive more traffic to your site.
Increase Engagement and Followers
Your blog readers might not know that you’re on Instagram. So, when you embed Instagram on your WordPress website, you’ll let them know you’re active on the platform.
This can help you get more Instagram followers and grow your social media presence.
Plus, when readers are able to see your Instagram feed on your website, it will encourage them to interact with your posts more by liking or commenting.
Update Your Blog Easily
With an Instagram feed embedded on your blog, it makes it easy to keep your site updated with fresh content. Every time you post new content on Instagram, it automatically appears on your website. This saves you time and shows that your blog is active.
Build Social Proof and Trust
If you share user-generated content like testimonials from your readers on Instagram, adding an Instagram widget to your site will help you build social proof and trust with website visitors.
Users on your site will see that other people trust your blog, which will encourage them to become loyal fans too.
Now that you know about all of the benefits of connecting your Instagram account with WordPress, let’s jump right into the tutorial.
How to Add an Instagram Widget in WordPress (Manually)
If you want to embed an Instagram feed in WordPress without a plugin, you can do it manually.
We recommend using a plugin to embed your Instagram feed to WordPress because it’s easier, and it will give you a ton of other display and customization options—more on that in the next section.
Plus, there’s lots of room for errors with the manual method to embed Instagram feeds, which can be difficult to fix if you’re not familiar with code.
But to add an Instagram widget manually, go to Instagram and start by selecting the photo you want to display on your WordPress post.
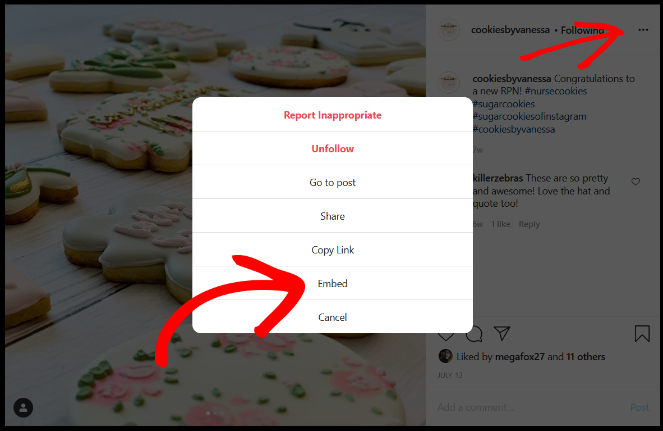
Click the 3 small dots in the upper right corner of the Instagram post. Then, click Embed.
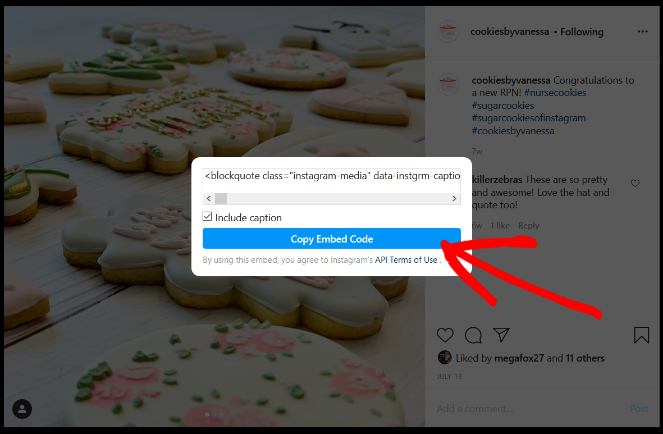
In the next step, click the blue Copy Embed Code button. Here, you also have the option of removing the caption from the embed if you want by unchecking the Include caption box.
Once you’ve copied the embed code from your Instagram profile, you can simply paste it to any post or page using the WordPress editor.
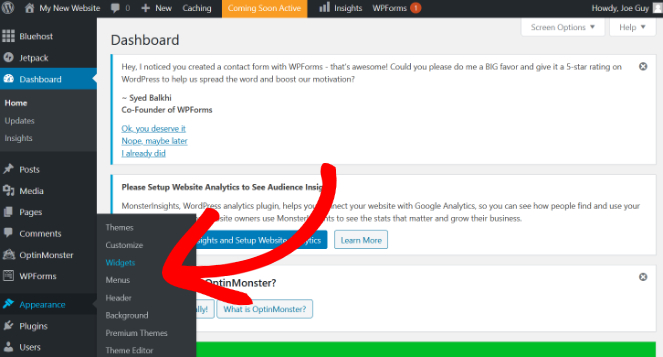
If you want to add an Instagram widget to your sidebar in WordPress, with the embed code copied, go to your WordPress dashboard. Then go to Appearance » Widgets.
On the left side of the Widgets page, you’ll see a list of available widgets. Find the Text widget and drag it over to the right side of the page where you want it to automatically embed on your site. For this tutorial, I’ll add Instagram to the sidebar.
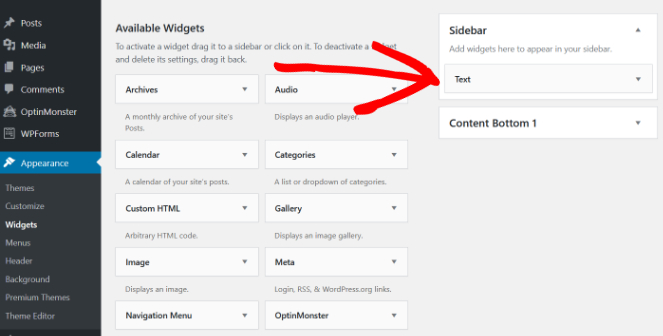
Once you’ve placed the widget where you want it on your site, click the dropdown arrow on the widget.
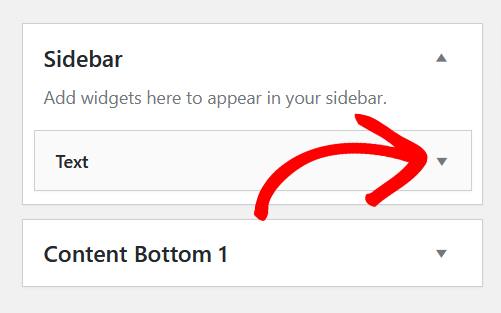
This will open up a text box where you can paste the Instagram embed code you copied earlier. Make sure you paste the embed code in the Text editor rather than the Visual editor.
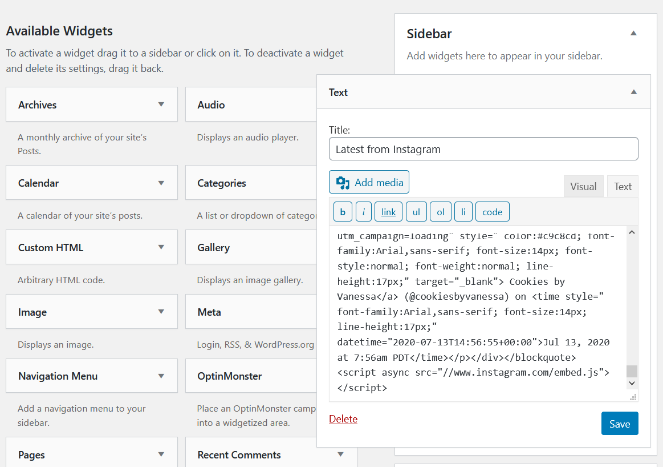
You can also add a title for your Instagram feed. Click Save when done.
That’s it.
Now, you can see your Instagram widget live on your blog.
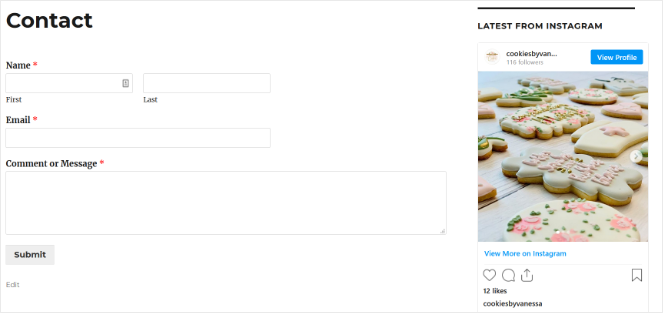
As you can see from the example above, you don’t have a lot of customization options when you manually add an Instagram widget in WordPress.
So, let’s take a look at a better way to add an Instagram widget to WordPress to embed Instagram posts.
How to Add an Instagram Widget in WordPress (Using a Plugin)
The easiest and best way to add an Instagram feed on your WordPress website is with a plugin. I recommend the Instagram Feed Pro Plugin by Smash Balloon.
Instagram Feed Pro is the #1 highest-rated Instagram plugin for WordPress.
Using this Smash Balloon plugin, in just a few clicks, you can easily add your Instagram feed on your WordPress site as a widget in your sidebar, to any post or page of your blog using the WordPress block editor, or by pasting a shortcode anywhere on your site.
Plus, Instagram Feed Pro comes with awesome features to help you create a powerful, customized Instagram widget, including:
- Multiple Layout Options – Choose from built-in layout options like carousel, grid, masonry, and highlight.
- Visual Moderation System – Decide which posts to show and which posts to hide.
- Social Engagement – Show Instagram stories, comments, likes, and a follow button on your feed.
- Responsive Design – Automatically adapts to different screen sizes to make your feed mobile-friendly.
- Multiple Instagram Feeds – Display as many different types of feeds on your site as you want.
Smash Balloon also offers a free version of the plugin, so if you want to embed your Instagram posts in WordPress before committing to a paid subscription, you can try it out.
But to access features like multiple layouts, comments and likes, combining feeds from multiple Instagram accounts, and hashtag feeds, you need to upgrade to the pro version.
Now, let’s go over how to use Smash Balloon to add an Instagram widget in WordPress, step by step.
And if you prefer, here’s a great video walkthrough you can follow:
Step 1: Install the Instagram Feed Plugin
First, you need to download Instagram Feed Pro Plugin from Smash Balloon and install and activate the plugin.
For beginners, check out this post on how to install a WordPress plugin for detailed instructions.
Step 2: Connect Your Instagram Account with the Plugin
Next, you need to connect your Instagram account with the Smash Balloon plugin. To allow access to your Instagram account, click on the Instagram Feed button in your WordPress dashboard that appears after downloading and activating the plugin.
This will bring you to the Instagram Feed plugin’s Settings page. Click on the blue Connect an Instagram Account button.
Follow the prompts that appear on the screen to connect your Instagram account.
The first prompt will ask you if you want to connect a Personal or Business Instagram account.
It’s important to note that for some Smash Balloon Instagram Feed features, like the hashtag feed or shoppable posts, you need to have a Business Instagram account.
Don’t worry if you only have a personal Instagram account right now, though, because you can always change it later.
Select your Instagram account type, and click Connect to continue.
That’s it! Your Instagram account is now connected to the Instagram Feed plugin.
Step 3: Choose the Instagram Content to Display
On the same page, you can also choose what type of Instagram content you want to feed to your WordPress website in your Instagram widget.
You can choose to display:
- Your standard Instagram feed
- A feed with photos from a specific public hashtag
- A feed with photos that you’re tagged in
- A mixed feed with multiple feed types
To display a simple feed of your latest Instagram posts, choose the User Account option, and click Save Changes.
Step 4: Pick the Layout for Your Instagram Widget
Go to the Settings page of the Instagram Feed plugin and click on the Customize tab.
On this page, you can decide how the Instagram widget will look on your blog with customization options to the live feed editor like:
- Width and height
- Background color
- Number of photos to show
- Show/hide your Instagram bio
- Add a Follow button
You can also choose what type of layout you want your Instagram widget to have. Instagram Feed from Smash Balloon offers 4 different layout options to choose from:
- Grid – A standard grid with fixed square images
- Carousel – A horizontal carousel that users can scroll through
- Masonry – A gallery that shows Instagram photos in their original horizontal or vertical format
- Highlight – A gallery that specific photos appear larger in the grid to highlight them
For this tutorial, I’ll choose the Grid layout, which looks like this:
Choose the layout type you want for the Instagram feed on your site and click Save Changes.
Step 5: Add Your Instagram Widget in WordPress
Now it’s time to add your Instagram widget plugin to your blog!
With Smash Balloon’s Instagram Feed plugin, you have 3 different ways to embed the Instagram feed to your website.
Let’s go over each of them.
1. Instagram Feed WordPress Block
To add an Instagram widget to a new page of your website using the WordPress block editor, first, go to Pages » Add New.
In the WordPress block editor, click the Plus (+) icon to search for a WordPress block. In the search bar type “Instagram” to find the Instagram Feed WordPress block.
Click the block to add it to your page.
You’ll then get a preview of how your Instagram photos and videos will look on your website, and you can tweak the settings if needed.
Publish the page to make your Instagram feed widget live on your blog!
Here’s an example of what the finished product looks like:
You can use this same method to add an Instagram feed to any existing page or post on your site.
2. Instagram Feed Shortcode
If you’re using the classic WordPress editor, you can use the Instagram Feed shortcode to display your feed in a post or page of your site.
Go to the Instagram Feed Settings page. In the Display Your Feed tab, copy the shortcode provided.
Then, simply paste the shortcode directly into your post or page editor.
Click Publish to save your changes and make your Instagram feed live on your site.
3. Instagram Feed WordPress Widget
If you want to add the Instagram feed block to appear in your sidebar, like the footer or the primary sidebar, you can use Smash Balloon’s built-in Instagram Feed widget.
Go to Appearance » Widgets from the WordPress dashboard.
Find the Instagram Feed widget on the left side and drag it over to your chosen sidebar. For this tutorial, I’m going to add an Instagram widget to the primary sidebar.
In the settings, you can add a title. When you’re done, click Save.
Now, when you preview your site, you can see your Instagram feed in the sidebar.
Key Takeaways
- Increase Engagement: Adding an Instagram feed to your WordPress blog provides extra content in the form of a social photo feed for your visitors, keeping them on your site longer and encouraging interaction with your posts.
- Improve SEO: Embedding Instagram captions helps search engines understand your content better, which can boost your blog’s search engine ranking.
- Easy Updates: An Instagram widget on your WordPress site ensures your blog stays current with new content. It is automatically updated whenever you post on Instagram.
- Build Trust: Showcasing user-generated content from Instagram on your blog builds social proof, fostering trust with your audience.
- Simple Integration: You can add an Instagram feed to WordPress manually or with plugins. Using the Instagram Feed Pro plugin offers the flexibility to display completely customizable Instagram feeds for different skill levels.
That’s a wrap!
Now, you’ve learned how to easily add an Instagram widget in WordPress. With your Instagram feed displayed beautifully on your blog, you can provide more interesting content to your readers, boost engagement, and grow your social media presence.
Want to display a Facebook feed on your blog, too? Check out our list of the best Facebook plugins for WordPress. You can also read our tutorial on how to embed a Facebook group in WordPress.
And don’t forget to sign up for our email newsletter for more helpful blogging tips!


0 Comments
Join in. The comments are closed after 30 days.